Blog

  • From Marla to Square Feet: The Ultimate Guide to Regional Land Measurement

    From Marla to Square Feet: The Ultimate Guide to Regional Land Measurement

    Navigating the world of real estate can feel like learning a whole new language, especially when you encounter traditional units like the Marla. If you have ever found yourself staring at a land deed or a property listing wondering exactly how much space you are getting, you are not alone. Converting Marla to Square Feet is one of the most common hurdles for buyers and sellers in South Asia. This regional converter simplifies the process, ensuring you don’t lose a single inch of your investment due to a math error. Whether you are planning a garden or building your dream home, understanding this conversion is the first step toward a successful project.

    What is a Marla and Why it Matters

    A Marla is a traditional unit of area used primarily in India, Pakistan, and Bangladesh. While the international real estate market often defaults to square feet or meters, the Marla remains the cultural and legal standard in many regions. Its importance cannot be overstated; property taxes, legal boundaries, and even bank loans are often calculated based on this specific unit.

    The reason this conversion is so vital is that the definition of a Marla can actually shift depending on where you are. Historically, under British rule, a standard Marla was fixed at 272.25 square feet. However, in modern urban development—specifically in cities like Lahore or parts of India—a “Big Marla” (272.25 sq ft) and a “Small Marla” (225 sq ft) often coexist. Knowing exactly which one you are dealing with can mean the difference between a spacious backyard and a cramped alleyway. Mastery of this unit ensures transparency in every transaction.

    Step-by-Step Guide: How to Use the Marla Converter

    Using our regional converter is straightforward. To ensure you get the most accurate results for your specific location, follow these simple steps:

    • Identify Your Region: Determine if your area uses the “Standard” (272.25) or “Local/Small” (225) Marla.

    • Locate the Measurement: Find the total number of Marlas listed on your property documents or plot map.

    • Apply the Conversion: * For the Standard Marla, multiply the number by 272.25.

      • For the Small Marla, multiply the number by 225.

    • Verify the Total: Once you have the result in square feet, you can easily compare it against standard construction requirements (like the size of a standard bedroom or garage).

    • Account for Fractions: If your plot is “5.5 Marlas,” ensure you include the decimal point to avoid significant rounding errors.

    The Math Behind the Measurement

    Understanding the science of land measurement requires looking back at the “Guz” or “Karam.” Traditionally, a Marla was defined as a square of 3 Karams by 3 Karams. Since one Karam is roughly 5.5 feet, the math works out as follows:

    $$1 \text{ Karam} = 5.5 \text{ feet}$$
    $$1 \text{ Sarsahi} = 1 \text{ Karam} \times 1 \text{ Karam} = 30.25 \text{ sq ft}$$
    $$1 \text{ Marla} = 9 \text{ Sarsahis}$$

    When we multiply the area of a Sarsahi by 9, we get the classic definition:

    $$30.25 \times 9 = 272.25 \text{ sq ft}$$

    In modern housing societies, this was rounded down to 225 square feet to create a cleaner grid of 15ft x 15ft units. Always check your local society bylaws to see which “math” they are applying to your specific plot.

    Real-Life Scenarios

    To put this into perspective, let’s look at how these conversions play out in the real world:

    Scenario 1: The Suburban Homebuyer

    Amir is looking at a “5 Marla” plot in a new modern housing scheme. In this specific development, they use the 225 sq ft standard.

    • Calculation: $5 \times 225 = 1,125$ square feet.

      Amir now knows he has enough space for a cozy three-bedroom house but might have a very small front lawn.

    Scenario 2: The Rural Inheritance

    Priya inherits a piece of ancestral land measured at 20 Marlas (1 Kanal). Because it is rural agricultural land, it follows the standard 272.25 sq ft rule.

    • Calculation: $20 \times 272.25 = 5,445$ square feet.

      Priya realizes her land is significantly larger than a standard urban “Kanal” (usually 4,500 sq ft), giving her more value than she initially thought.

    FAQs (Frequently Asked Questions)

    1. Is a Marla the same size everywhere?

    No. In Pakistan and India, a Marla can be either 225, 250, or 272.25 square feet depending on the city and the specific housing authority (like CDA or LDA). Always verify the local standard before signing a contract.

    2. How many Marlas make a Kanal?

    In almost all regional systems, 20 Marlas equal 1 Kanal. However, the total square footage of that Kanal will change based on whether you are using the 225 or 272.25 Marla unit.

    3. Why did the size of a Marla change over time?

    The change was largely for convenience in urban planning. A 225 sq ft Marla allows for easy 15×15 foot dimensions, making it much simpler for architects and developers to design uniform housing blocks compared to the traditional 272.25 sq ft unit.

    Conclusion & CTA

    Understanding the conversion between Marla and Square Feet is the hallmark of a savvy property owner. By mastering these regional nuances, you protect your investment and gain clarity in your construction planning. Don’t leave your measurements to guesswork! Use our Regional Marla Converter tool today to get instant, accurate results tailored to your specific location.

    Ready to calculate your plot size? Try our free converter now and start building with confidence!

  • Master the Polynomial Long Division Calculator: A Step-by-Step Guide

    Master the Polynomial Long Division Calculator: A Step-by-Step Guide

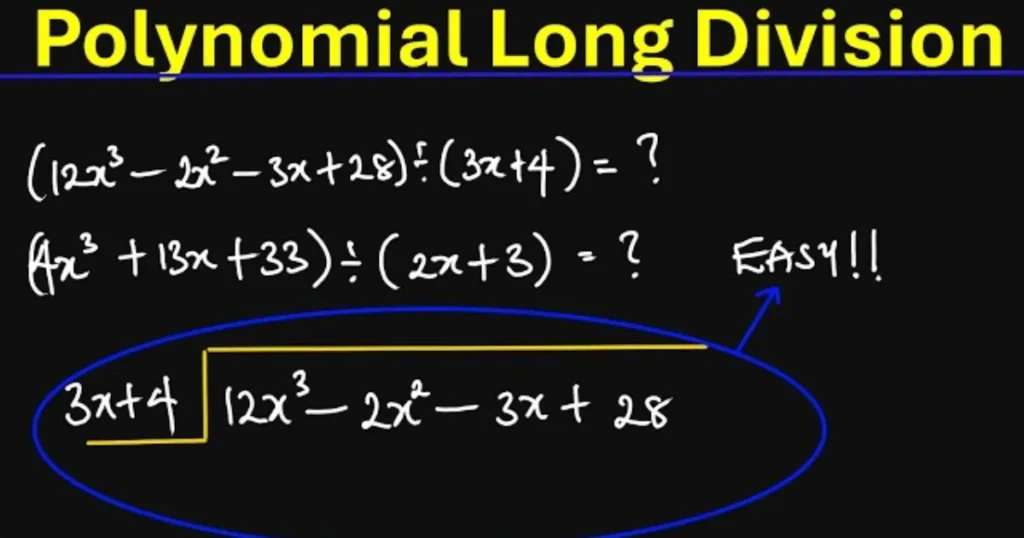
    How to Master Polynomial Long Division Without the Headache

    Let’s be honest: the moment a math problem shifts from simple numbers to a string of $x^2$, $y^3$, and nested parentheses, most people feel a sudden urge to close the textbook. Polynomial long division is one of those academic hurdles that feels unnecessarily complex, often leading to “sign errors” that ruin the entire calculation. Whether you are a student trying to ace your algebra exam or a professional dealing with complex functions, the manual process is tedious and prone to human slip-ups.

    That is where a Polynomial Long Division Calculator becomes your best friend. Instead of spending twenty minutes scratching your head over a single remainder, this tool breaks down the process instantly. It doesn’t just give you the answer; it mirrors the logical flow of a mathematician, helping you visualize the “divide, multiply, subtract, bring down” cycle. In this guide, we’ll explore how this tool works, the logic behind it, and how you can use it to master your coursework.

    What is a Polynomial Long Division Calculator and Why it Matters

    At its core, a Polynomial Long Division Calculator is a specialized digital engine designed to divide one polynomial (the dividend) by another (the divisor) of the same or lower degree. If you remember long division from third grade—where you find how many times 5 goes into 27—this is the “grown-up” version. Instead of simple integers, we are dealing with terms like $3x^3 + 2x – 5$.

    Why is this tool essential?

    • Factoring Higher-Degree Equations: When you need to find the roots of a cubic or quartic function, division is often the only way to “break down” the equation into manageable parts.
    • Identifying Asymptotes: In calculus, dividing polynomials helps you find slant asymptotes, which are crucial for graphing rational functions.
    • Accuracy and Speed: A single missed negative sign in the subtraction phase cascades through the rest of the problem. A calculator eliminates this risk, providing a perfect “check” for your manual work.
    • Conceptual Clarity: By seeing the step-by-step breakdown, users can identify exactly where their manual logic went wrong, making it an excellent tutoring aid.

    Step-by-Step Guide: Using the Calculator Effectively

    Using the tool is straightforward, but inputting your data correctly is key to getting the right result. Follow these steps:

    • Step 1: Arrange your Terms. Ensure both your dividend and divisor are in descending order of power (e.g., $x^2 + 5x + 6$ instead of $5x + 6 + x^2$).

    • Step 2: Account for Missing Powers. If your equation is $x^3 + 1$, you must treat it as $x^3 + 0x^2 + 0x + 1$. Most calculators need these “placeholders” to align columns correctly.

    • Step 3: Input the Dividend. Enter the primary polynomial you want to divide into the first input box.

    • Step 4: Input the Divisor. Enter the polynomial you are dividing by into the second box.

    • Step 5: Calculate. Hit the “Solve” or “Divide” button.

    • Step 6: Review the Breakdown. The tool will present the Quotient (the result) and the Remainder (what’s left over). Many tools will also show the long-form “tableau” showing each subtraction step.

    The Math Behind the Tool: The Division Algorithm

    The calculator follows a very specific mathematical protocol known as the Division Algorithm for Polynomials. To understand what the tool is doing under the hood, we use this fundamental formula:

    $$P(x) = D(x) \cdot Q(x) + R(x)$$

    Where:

    • $P(x)$ is the Dividend (the total value).
    • $D(x)$ is the Divisor (what you are dividing by).
    • $Q(x)$ is the Quotient (how many times it fits).
    • $R(x)$ is the Remainder (the leftover part, which must be of a lower degree than the divisor).

    The process mimics basic arithmetic division. The tool looks at the leading term of the divisor and asks, “What do I need to multiply this by to match the leading term of the dividend?” It then multiplies the entire divisor by that factor, subtracts it from the dividend, and repeats the process with the new result until the remaining degree is lower than the divisor’s degree.

    Real-Life Scenarios: When Will You Use This?

    Polynomial division isn’t just for passing a test; it has practical applications in science and finance.

    Scenario 1: Engineering and Signal Processing

    Engineers often use polynomial division when working with System Transfer Functions. If an engineer needs to simplify a complex feedback loop in a circuit, they may divide two high-order polynomials to determine the stability of the system.

    Scenario 2: Financial Modeling

    In advanced quantitative finance, analysts use polynomial interpolation to predict market trends. If a model generates a complex curve representing interest rate changes, dividing that polynomial can help isolate “linear trends” from “noise” or volatile remainders.

    Scenario 3: Physics (Projectiles)

    If a physicist has a polynomial representing the path of a projectile influenced by air resistance, they might divide that function by a linear factor (like time) to find the average velocity or to simplify the equation for specific intervals of flight.

    FAQs: Common Questions About Polynomial Division

    1. What is the difference between Long Division and Synthetic Division?

    Synthetic division is a “shortcut” method, but it only works when your divisor is a linear factor in the form $(x – c)$. Polynomial long division is more versatile because it works for any divisor, including quadratic or cubic ones.

    2. Can the remainder be a negative number?

    Absolutely. In polynomial division, the “remainder” is itself a polynomial. It can have negative coefficients or even be a negative constant.

    3. What does it mean if the remainder is zero?

    If $R(x) = 0$, it means the divisor is a factor of the dividend. This is incredibly helpful for solving equations because it tells you that you’ve found an exact “root” or piece of the puzzle.

    Conclusion: Simplify Your Math Journey

    Polynomial long division doesn’t have to be a source of frustration. By understanding the underlying algorithm and utilizing a Polynomial Long Division Calculator, you can transform a tedious 20-minute chore into a 5-second verification. This tool allows you to focus on the “why” of the math rather than getting bogged down in the “how” of repetitive subtraction.

    Ready to clear your homework queue? Try our Polynomial Long Division Calculator today to get instant, step-by-step solutions and master your algebra goals!

  • The Ultimate Word to Page Converter (Double Spaced) Guide

    The Ultimate Word to Page Converter (Double Spaced) Guide

    Ever found yourself staring at a growing word count, wondering if you’ve finally hit that 10-page requirement for your term paper? Or perhaps you’re drafting a manuscript and need to know how much physical “heft” your story actually has. Understanding the relationship between words and pages—especially when double spacing is involved—is a vital skill for students, lawyers, and authors alike.

    While it seems like a simple question, the answer is often a moving target. Factors like font type, margin size, and paragraph breaks can shift your layout significantly. However, when we talk about the standard academic or professional format, there are reliable benchmarks you can use to plan your writing perfectly. This guide will demostrate how a Word to Page Converter functions as your secret weapon for hitting length requirements without the guesswork.

    What is a Word to Page Converter and Why It Matters

    A Word to Page Converter is a conceptual or digital tool used to estimate the physical length of a document based on its total word count. In the professional world, “length” is rarely measured by words alone; it’s measured by the space it occupies on a printed sheet.

    Why the “Double Spaced” Standard?

    Double spacing is the gold standard for academic essays (MLA, APA), legal briefs, and book manuscripts. It provides ample room for editors and professors to leave comments, making the text much more readable and less “dense.”

    Why accuracy matters:

    • Academic Compliance: Missing a page count by half a page can result in grade deductions.

    • Publishing Standards: Publishers often request manuscripts in a specific page range to calculate printing costs.

    • Time Management: Knowing that 500 words equal roughly two pages helps you pace your writing sessions effectively.

    Step-by-Step Guide: How to Calculate Pages from Words

    Converting your word count manually doesn’t require a math degree, but it does require following a specific set of formatting rules. Follow these steps to ensure your “page” matches the industry standard.

    • Set Your Font: Use a standard 12-point font. Times New Roman is the universal benchmark, though Arial or Calibri are common alternatives.

    • Adjust Margins: Ensure your margins are set to 1 inch (2.54 cm) on all sides (Top, Bottom, Left, and Right).

    • Apply Double Spacing: In your word processor, set the line spacing to 2.0. This adds a full blank line of space between every line of text.

    • The Golden Rule: For a standard 12pt Times New Roman document with 1-inch margins, 250 to 300 words typically equal one double-spaced page.

    • Account for Paragraphs: If you use frequent, short paragraphs, you will reach the bottom of the page faster than if you write long, dense blocks of text.

    The Math Behind the Conversion

    To understand how we get to the “275-word average,” we have to look at the typography. A standard letter-size page ($8.5 \times 11$ inches) with 1-inch margins leaves a printable area of $6.5 \times 9$ inches.

    Using a standard 12pt font, a single line of text usually holds about 10–12 words. A single-spaced page typically contains about 50–55 lines of text. When you apply double spacing, you effectively cut that line count in half, leaving you with roughly 25–27 lines.

    The simplified formula for estimation is:

    $$P = \frac{W}{275}$$

    Where:

    • $P$ = Number of Pages

    • $W$ = Total Word Count

    • $275$ = The average words per double-spaced page.

    If you are using a wider font like Arial, you might find that only 250 words fit on a page. If you use a narrow font like Courier, the character spacing might change that number again.

    Real-Life Scenarios

    How does this play out in the real world? Let’s look at a few common writing tasks:

    Scenario 1: The College Freshman

    Alex has been assigned a 5-page research paper on climate policy, double-spaced. By using our conversion logic, Alex knows he needs to aim for approximately 1,375 to 1,500 words. Knowing this number upfront prevents Alex from “fluffing” the paper with useless adjectives at the last minute.

    Scenario 2: The Aspiring Novelist

    Sarah is told by a literary agent that they want to see the first 30 pages of her novel. Sarah’s manuscript is currently single-spaced. To meet the professional “double-spaced” submission standard, she realizes those 30 pages will represent roughly 8,250 words.

    Scenario 3: The Legal Assistant

    A law firm needs to file a 20-page brief. The assistant calculates that they need to provide approximately 5,500 words of content. This helps the legal team delegate sections of the brief to different writers while staying within the court’s page limits.

    FAQs

    1. Does the font type really change the page count that much?

    Yes. For example, 500 words in Arial (which is wider) will take up more physical space than 500 words in Times New Roman. Always check your specific style guide (APA, MLA, etc.) for the required font.

    2. Do images and charts count toward the word-to-page conversion?

    The conversion formulas only account for text. If you add a medium-sized chart, it generally occupies the space of about 100–150 words. You’ll need to adjust your total word count target downward if your paper is heavy on visuals.

    3. Is 500 words always 2 pages double-spaced?

    Usually, yes. In a standard format, 500 words will land right at the bottom of the second page or the top of the third. It is the most common “shorthand” conversion used in schools.

    Conclusion & CTA

    Converting words to pages doesn’t have to be a guessing game. By sticking to the 275-words-per-page rule for double-spaced documents, you can write with confidence, knowing exactly when you’ll hit your target. Whether you’re drafting a thesis or a formal report, proper formatting ensures your work looks professional and is easy to digest.

    Ready to see how your project measures up? Use our interactive Word to Page Converter tool today to get an instant, accurate estimate for your next big project!

  • Master the Switch: Scientific Notation to Decimal Converter Guide

    Master the Switch: Scientific Notation to Decimal Converter Guide

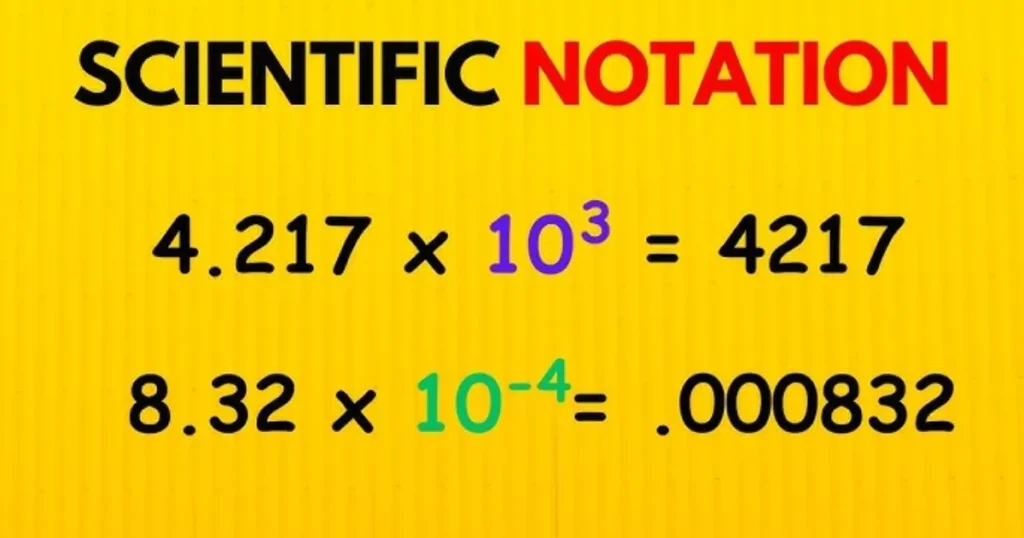
    Have you ever looked at a number like $6.022 \times 10^{23}$ and felt your brain do a quick somersault? You aren’t alone. Whether you are a student tackling chemistry homework or a professional analyzing massive data sets, scientific notation can feel like a foreign language. It’s a brilliant shorthand for scientists, but for the rest of us, it can make it incredibly difficult to visualize the actual scale of a number. Is it millions? Billions? Or just a tiny fraction of a cent?

    That is exactly where a Scientific Notation to Decimal Converter comes into play. Instead of manually counting zeros and risking a misplaced decimal point, this tool does the heavy lifting for you. It bridges the gap between complex mathematical shorthand and the “normal” numbers we use every day. In this guide, we’ll break down why this conversion matters and show you exactly how to master the process so you never have to second-guess your zeros again.

    What is a Scientific Notation to Decimal Converter and Why it Matters?

    A Scientific Notation to Decimal Converter is a specialized digital tool designed to translate numbers from the “power of 10” format into standard decimal form (also known as “long-form” or “standard notation”).

    Why does this matter? In fields like astronomy, microbiology, and finance, numbers are often too large or too small to write out conveniently. For example, the mass of the Earth is roughly $5.97 \times 10^{24}$ kilograms. Writing that out with 22 zeros trailing behind it is not only tedious but prone to human error. However, while scientific notation is efficient for writing, it isn’t always intuitive for comparison or communication.

    Converting these figures back to decimals is crucial for:

    • Data Visualization: Understanding the literal “size” of a value.

    • Precision Engineering: Ensuring that measurements are translated correctly for manual machinery.

    • General Literacy: Making scientific findings accessible to the general public who may not be comfortable with exponents.

    By using a converter, you eliminate the risk of “zero-blindness”—that common mistake where you accidentally add or subtract a zero, changing the value by a factor of ten.

    Step-by-Step Guide: How to Use the Converter

    Using our Scientific Notation to Decimal Converter is straightforward. Follow these steps to get an instant, accurate result:

      • Step 1: Identify your Coefficient. Look at the first part of your number (e.g., in $4.5 \times 10^3$, the coefficient is $4.5$).

      • Step 2: Note the Exponent. Look at the power of 10. This tells you how many places to move the decimal point.

      • Step 3: Enter the Data. Input the coefficient and the exponent into the respective fields of the tool.

      • Step 4: Check the Sign. If the exponent is positive (e.g., $10^5$), the number is large. If it is negative (e.g., $10^{-5}$), the number is a small decimal.

      • Step 5: Hit Convert. The tool will instantly display the “expanded” decimal version.

      • Step 6: Copy and Use. You can now copy the long-form number for your reports, spreadsheets, or calculations.

    The Math Behind the Magic: The Formula

    Under the hood, the converter follows a very specific mathematical rule. Scientific notation always follows the format:

    $$a \times 10^n$$

    Where:

    • $a$ is the coefficient (a number between 1 and 10).

    • $n$ is the exponent (an integer).

    The Rule of Displacement: The exponent $n$ dictates exactly how many places the decimal point moves.

    1. Positive Exponent ($+n$): You move the decimal point to the right. This creates a large number. For every jump, if you run out of digits, you add a zero.

    2. Negative Exponent ($-n$): You move the decimal point to the left. This creates a small decimal (less than 1). You fill the empty jumps with leading zeros.

    Example: $3.1 \times 10^4$. We move the decimal 4 places to the right: $3.1 \rightarrow 31 \rightarrow 310 \rightarrow 3100 \rightarrow 31000$.

    Real-Life Scenarios

    How does this look in the real world? Here are a few practical examples where a Scientific Notation to Decimal Converter saves the day:

    Scenario 1: The Space Enthusiast An astronomer tells you that a specific star is $9.46 \times 10^{12}$ kilometers away. By using the converter, you see that this is actually 9,460,000,000,000 km (9.46 trillion kilometers). It helps you realize the staggering vastness of space compared to a simple “12” on a page.

    Scenario 2: Biology Lab Work A lab technician is measuring the width of a human hair, which is approximately $7.0 \times 10^{-5}$ meters. Converting this to a decimal yields 0.00007 meters. This decimal form is often easier to use when comparing the width to other microscopic objects in a standard spreadsheet.

    Scenario 3: Federal Budgeting If a government project is estimated to cost $\$1.2 \times 10^9$, the converter clarifies that the taxpayers are looking at $1,200,000,000 (1.2 billion). Seeing the nine zeros helps in understanding the true fiscal impact.

    FAQs: Common Questions About Scientific Notation

    1. Can any number be written in scientific notation? Yes! Any real number can be converted. However, it is most useful for very large or very small numbers. Standard numbers like “50” are usually left as they are, though they could technically be written as $5.0 \times 10^1$.

    2. What does a negative exponent mean? A negative exponent signifies that the number is between 0 and 1. It does not mean the number itself is negative. It simply means you are dividing by 10 that many times.

    3. Why do calculators sometimes show “E” instead of $10^n$?“E” stands for exponent. On many calculators, $5.2E6$ is the same as $5.2 \times 10^6$. Our converter handles both formats to make your life easier.

    Conclusion & CTA

    Understanding scientific notation is a vital skill, but you shouldn’t have to do the tedious counting yourself. Our Scientific Notation to Decimal Converter is built to provide you with instant accuracy, whether you are working on a high-stakes physics project or just curious about a number you saw in the news.

    Ready to simplify your data? Use our free Scientific Notation to Decimal Converter now and get your results in seconds!

  • The Ultimate Guide to Calculating Your GPA for Matric and Inter: Simplify Your Path to Success

    The Ultimate Guide to Calculating Your GPA for Matric and Inter: Simplify Your Path to Success

    Navigating the transition from the traditional percentage system to the Grade Point Average (GPA) system can feel like trying to solve a puzzle without the box art. Whether you are a student in Pakistan aiming for top-tier universities or a parent trying to track your child’s academic progress, understanding how GPA works for Matric and Intermediate (Inter) levels is crucial.

    Many students feel overwhelmed when they see letters like ‘A+’ or numbers like ‘3.7’ instead of a simple 85%. This transition isn’t just about changing numbers; it’s about aligning with international academic standards. This guide is designed to demystify the process, showing you exactly how your hard work in the exam hall translates into a competitive GPA. By the time you finish reading, you’ll be able to calculate your standing with confidence and precision.

    What is GPA for Matric/Inter and Why It Matters

    In the context of Matric (9th and 10th grade) and Intermediate (11th and 12th grade), the Grade Point Average (GPA) is a standardized way of measuring academic achievement. Traditionally, boards in Pakistan relied solely on total marks and percentages. However, to harmonize with global standards and provide a fairer assessment of a student’s capability across different subjects, the GPA system has become the gold standard.

    Why does it matter so much? First, university admissions—both locally and abroad—now prioritize GPA to filter applications. A high GPA tells an admissions officer that you are consistently performing well across your entire curriculum, not just “cramming” for one specific high-weightage subject. Second, it levels the playing field. Since different elective subjects may have varying levels of difficulty, the GPA system uses a weighted scale to ensure that a student taking Physics is evaluated fairly alongside a student taking Humanities. Essentially, it turns your raw scores into a universal language of success that employers and educators worldwide understand.

    Step-by-Step Guide: How to Calculate Your GPA

    Calculating your GPA doesn’t require a PhD in mathematics. Follow these simple steps to find your score:

    • Step 1: List Your Subjects and Marks: Write down every subject you took in your Matric or Inter exams along with the marks you obtained.

    • Step 2: Identify the Grade Point for Each Subject: Use the official board grading table to convert your percentage in each subject into a Grade Point (typically on a scale of 0.0 to 4.0). For example, 80% and above usually equals a 4.0.

    • Step 3: Determine Credit Hours: Each subject has a specific number of “Credit Hours” (CH). In many boards, a core science subject might be 3 or 4 CH, while an elective might be 2.

    • Step 4: Calculate Quality Points: Multiply the Grade Point of each subject by its Credit Hours.

      • Example: If you got a 4.0 in Biology (3 CH), your Quality Points for that subject are $4.0 \times 3 = 12.0$.

    • Step 5: Sum Everything Up: Add up all your Quality Points and then add up all your total Credit Hours.

    • Step 6: The Final Division: Divide your total Quality Points by the total Credit Hours. The resulting number is your GPA.

    The Math and Formula Behind the GPA

    The logic behind the GPA is a weighted average. Unlike a simple average where every number has equal “say,” a weighted average gives more importance to subjects that take more time to study (higher credit hours).

    The primary formula used is:

    $$GPA = \frac{\sum (Grade \ Point \times Credit \ Hours)}{\sum Credit \ Hours}$$

    In this equation:

    • $\sum$ (Sigma): This symbol simply means “the sum of.”

    • Grade Point: This is the numerical value assigned to your letter grade (e.g., A+ = 4.0, A = 3.7, B = 3.0).

    • Credit Hours: This represents the weight of the course.

    By using this formula, the system ensures that performing well in a major 4-credit hour subject has a more significant positive impact on your overall score than a 1-credit hour auxiliary subject.

    Real-Life Scenarios

    To help you visualize how this works, let’s look at two common student profiles:

    Scenario A: The Balanced All-Rounder

    Sara is a Pre-Medical student. She scores an ‘A’ (3.7) in Biology (4 CH), an ‘A-‘ (3.3) in Chemistry (4 CH), and a ‘B+’ (3.0) in English (2 CH).

    • Quality Points: $(3.7 \times 4) + (3.3 \times 4) + (3.0 \times 2) = 14.8 + 13.2 + 6.0 = 34.0$

    • Total Credit Hours: $4 + 4 + 2 = 10$

    • Sara’s GPA: $34.0 / 10 = 3.40$

    Scenario B: The High-Achiever

    Ahmed is a Matric student. He gets a ‘A+’ (4.0) in Math (3 CH), an ‘A+’ (4.0) in Physics (3 CH), and an ‘A’ (3.7) in Urdu (2 CH).

    • Quality Points: $(4.0 \times 3) + (4.0 \times 3) + (3.7 \times 2) = 12 + 12 + 7.4 = 31.4$

    • Total Credit Hours: $3 + 3 + 2 = 8$

    • Ahmed’s GPA: $31.4 / 8 = 3.92$

    FAQs: Common Questions About Matric/Inter GPA

    1. Is a 4.0 GPA possible in Matric/Inter?

    Yes, it is possible! If you score above the threshold (usually 80% or 85% depending on the board’s specific policy) in every single subject, you will achieve a perfect 4.0 GPA.

    2. Does a low GPA in Matric affect my university admission?

    While Intermediate (FSc/ICS) grades usually carry more weight for university entrance, your Matric GPA is often used as a tie-breaker or as a percentage of the total “aggregate” score in competitive fields like Engineering or Medicine.

    3. What is the difference between GPA and CGPA?

    GPA (Grade Point Average) usually refers to the score of a single semester or year. CGPA (Cumulative Grade Point Average) is the average of your GPA across your entire degree or two-year program (e.g., combining 1st year and 2nd year Inter).

    Conclusion & Next Step

    Understanding your GPA is the first step toward taking control of your academic future. It shifts the focus from just “passing” to mastering each subject according to its weight and importance. By using the formulas and steps outlined above, you can stop guessing and start planning your path to your dream university.

  • How to Easily Convert Your CGPA to Percentage (HEC/Board Standards)

    How to Easily Convert Your CGPA to Percentage (HEC/Board Standards)

    If you’ve ever looked at your transcript and felt a wave of confusion about how your CGPA to Percentage actually translates in the “real world,” you are definitely not alone. Whether you are applying for a scholarship, a government job, or an international university, they often demand a percentage rather than a decimal point out of 4.0. It feels like a high-stakes math riddle, and getting it wrong could mean the difference between an accepted application and a missed opportunity.

    That’s exactly why a dedicated converter tool is a lifesaver. Instead of manually crunching numbers and worrying about whether you’re following the Higher Education Commission (HEC) or your specific board’s guidelines, a converter does the heavy lifting for you. It bridges the gap between different grading systems, ensuring your hard work is represented accurately and professionally on every application you submit.

    What is a CGPA to Percentage Converter and Why it Matters

    A CGPA to Percentage converter is a specialized tool designed to translate your Cumulative Grade Point Average (typically on a 4.0 or 5.0 scale) into a percentage format (out of 100). In the academic landscape of Pakistan and many Commonwealth countries, the HEC provides specific formulas to ensure uniformity across different universities.

    Why does this matter so much? Consistency is key. Different institutions have different “difficulty curves.” A 3.5 CGPA at one university might be an 80%, while at another, it could be an 85% depending on the internal grading criteria. However, for standardized applications—like those for the CSS exams, HEC scholarships, or foreign visas—a standardized percentage is often the “universal language.” Using a precise converter ensures:

    • Accuracy: You avoid human error in complex calculations.

    • Compliance: You stay aligned with official HEC or Board regulations.

    • Competitiveness: In many merit-based selections, even a 1% difference can change your ranking significantly.

    Step-by-Step Guide: How to Use the Converter

    Using our CGPA to Percentage tool is straightforward. Follow these simple steps to get your results in seconds:

    • Step 1: Identify Your Scale. Check your transcript to see if your CGPA is out of 4.0 (standard for most universities) or 5.0.

    • Step 2: Enter Your CGPA. Type your current CGPA into the input box. Be precise—include all decimal points (e.g., 3.67).

    • Step 3: Select the Authority. Choose whether you are following HEC guidelines (for University students) or a Technical Board (for matric/intermediate/diploma levels).

    • Step 4: Click Convert. Hit the “Calculate” button to process the conversion.

    • Step 5: Review and Save. The tool will display your percentage. It’s a good idea to take a screenshot or note it down for your CV.

    The Math/Formula Behind It

    While the tool makes it look easy, there is a specific logic running in the background. The HEC and various Boards use different formulas to ensure fairness.

    For most university-level conversions in Pakistan, the HEC often refers to a linear scaling or a specific percentage-based mapping. A common general-purpose formula used for a 4.0 scale is:

    $$\text{Percentage} = \frac{\text{Obtained CGPA}}{\text{Total CGPA}} \times 100$$

    However, some boards and specific international standards (like the AIU or certain Indian boards) use a “constant factor” formula, such as:

    $$\text{Percentage} = (\text{CGPA} \times 9.5)$$

    In the HEC system, the conversion is often non-linear, meaning they provide a table where a 4.0 equals 90-100%, a 3.5 equals 80%, and so on. Our tool incorporates these specific mapping tables to ensure you aren’t just getting a raw math result, but a policy-compliant one.

    Real-Life Scenarios

    To help you understand how this looks in practice, let’s look at a few examples:

    Scenario A: The Scholarship Applicant

    Amna has a CGPA of 3.80 / 4.0. She is applying for a scholarship in Germany that requires a minimum of 85%. By using the HEC-aligned converter, she finds her percentage is approximately 88%. She can now confidently apply, knowing she exceeds the requirement.

    Scenario B: The Government Job Seeker

    Ali is applying for a position through the PPSC. The form asks for a percentage, but his transcript only shows a 3.20 / 4.0. Using the standard formula $(\frac{3.2}{4.0} \times 100)$, the tool shows him he has an 80%. This allows him to fill out his form without the stress of being disqualified for “incorrect data.”

    FAQs

    1. Is the CGPA to Percentage conversion the same for all universities?

    Not necessarily. While the HEC provides a standard guideline, some private universities have their own internal grading increments. Always check if your university has a conversion formula printed on the back of your transcript first.

    2. Why do some formulas multiply by 9.5?

    The $9.5$ multiplier is a standard used largely by the CBSE and some engineering boards. It accounts for the fact that even a student with a 10/10 CGPA rarely gets a perfect 100% in all subjects due to internal marking nuances.

    3. Does HEC accept the simple division formula?

    For most official purposes, yes, but they also use a “Grade-Point Table.” Our tool is updated with the latest HEC-recognized tables to ensure the highest accuracy for Pakistani graduates.

    Conclusion & CTA

    Converting your CGPA to Percentage shouldn’t be a source of anxiety. Whether you’re heading toward a professional career or further studies, having the right numbers is the first step toward success. Don’t leave your future to guesswork—use our precise CGPA to Percentage Converter today to get the accurate results you need for your next big move!

    Ready to calculate your score? Enter your CGPA above and get started!

  • The Ultimate Tire Size Comparison Calculator Guide

    The Ultimate Tire Size Comparison Calculator Guide

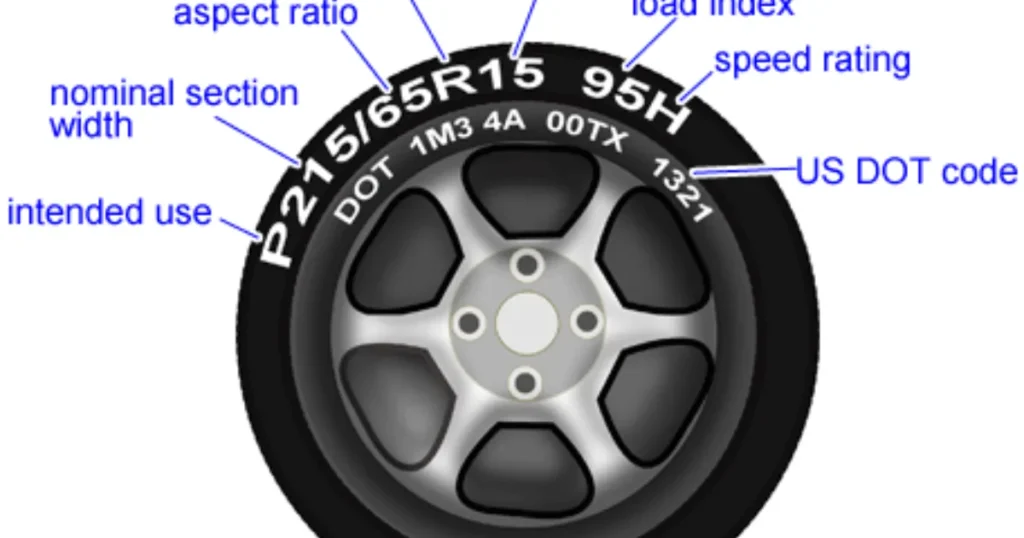
    Upgrading your wheels or tires is one of the most exciting ways to customize your vehicle, but it’s also one of the easiest ways to accidentally mess up your car’s performance. If you’ve ever looked at a sidewall and seen a string of confusing numbers like 245/40R18, you know the struggle. Choosing a tire that is too tall might rub against your wheel well, while one that is too short can make your speedometer lie to you. This is where a Tire Size Comparison Calculator becomes your best friend. Instead of guessing and hoping for the best, you can see exactly how a new set of rubber changes your ride height, gear ratio, and speed readings before you spend a single cent at the shop.

    What is a Tire Size Comparison Calculator and Why it Matters

    A Tire Size Comparison Calculator is a digital tool designed to measure the physical differences between two different tire specifications. It takes the width, aspect ratio, and wheel diameter of your current setup and compares them against a potential new size.

    Why does this matter? Your vehicle’s computer is calibrated based on the factory tire’s rolling diameter. When you change that diameter, everything from your anti-lock braking system (ABS) to your fuel economy sensors can be thrown out of sync.

    • Speedometer Accuracy: If your new tires have a larger circumference, your speedometer will report a speed lower than what you are actually traveling.
    • Clearance Issues: Larger tires can “rub” against the suspension or fenders during sharp turns.

      Performance: Wider tires offer better grip but can increase rolling resistance and lower your MPG.

    • Aesthetics: Most drivers use these calculators to achieve that perfect “flush” look without sacrificing the car’s drivability.

    Step-by-Step Guide: How to Use the Calculator

    Using the tool is straightforward, but accuracy is key. Follow these steps to ensure you get the right data:

    • Locate Your Current Specs: Look at the sidewall of your current tires or the sticker inside your driver-side door jamb. You need three numbers (e.g., 225/45R17).
    • Input the “Current” Tire: Enter the Width (225), Aspect Ratio (45), and Rim Diameter (17) into the “Existing” column of the tool.
    • Input the “New” Tire: Enter the specifications of the tire size you are considering upgrading to.
    • Analyze the Diameter Difference: Look for the percentage of change. A general rule of thumb in the automotive industry is to stay within 3% of the original diameter to avoid mechanical issues.
    • Check the Speedometer Offset: The tool will show you “Actual Speed vs. Indicated Speed.” If it says 65 mph but you’re actually doing 68, you’ll need to decide if that’s a margin you’re comfortable with.
    • Review Side-by-Side Visuals: Most calculators provide a 2D overlay. Use this to check if the new tire will sit closer to your suspension components.

    The Math Behind the Rubber: How It’s Calculated

    Understanding tire math is simpler than it looks once you break down the metric and imperial mix. Let’s use the standard formula to find the Total Diameter ($D$) of a tire.

    The formula consists of the wheel diameter plus the height of two sidewalls (top and bottom). Since sidewall height is a percentage of the width, we calculate it like this:

    $$D = (W \times \frac{AR}{100} \times 2 / 25.4) + RD$$

    Where:

    • $W$ = Section Width (in millimeters)
    • $AR$ = Aspect Ratio (the percentage of the width)
    • $RD$ = Rim Diameter (in inches)
    • $25.4$ = The conversion factor from millimeters to inches

    For example, on a 245/40R18 tire:

    1. Sidewall Height: $245 \text{ mm} \times 0.40 = 98 \text{ mm}$.

    2. Total Sidewall (Top + Bottom): $98 \text{ mm} \times 2 = 196 \text{ mm}$.

    3. Convert to Inches: $196 / 25.4 \approx 7.72 \text{ inches}$.

    4. Total Diameter: $7.72 + 18 = 25.72 \text{ inches}$.

    Real-Life Scenarios

    Scenario 1: The Off-Road Enthusiast

    John wants to put “beefier” tires on his truck for weekend trails. His stock size is 265/70R17 ($31.6$ inches tall). He wants to move to 285/70R17 ($32.7$ inches tall).

    • The Result: The calculator shows a 3.5% increase in diameter. John now knows he might need a small leveling kit to prevent the tires from rubbing when he hits a bump off-road.

    Scenario 2: The Commuter Seeking Comfort

    Sarah drives a sedan with low-profile 225/40R18 tires. She finds the ride too bumpy and wants more “meat” on the sidewall, eyeing a 225/45R18.

    • The Result: This change increases the sidewall height by about $0.45$ inches. The calculator shows a 3.4% speed error. When her speedometer says 60 mph, she’s actually going 62 mph. She decides the extra comfort is worth the small speed discrepancy.

    Frequently Asked Questions (FAQs)

    1. Will a different tire size void my warranty?

    Generally, no, but it can affect claims related to the drivetrain or suspension if the manufacturer can prove the oversized tires caused premature wear on the wheel bearings or transmission.

    2. Can I change tire width without changing my wheels?

    Yes, but every rim has a “range” of widths it can safely support. A tire that is too wide for the rim will bulge (poor handling), and one that is too narrow will be “stretched” (safety risk).

    3. What is the “Aspect Ratio” exactly?

    It is the height of the sidewall expressed as a percentage of the width. In a 200/50 tire, the sidewall is $100\text{mm}$ tall (50% of 200).

    Conclusion & CTA

    Choosing the right tires is a balance of physics, safety, and style. By using a Tire Size Comparison Calculator, you remove the guesswork and ensure your vehicle remains safe and efficient. Whether you’re aiming for a rugged off-road look or a sleek street stance, always double-check your math before hitting the “buy” button.

    Ready to see how your new setup measures up? Plug your numbers into our Tire Size Comparison Calculator today and drive with peace of mind!

  • Gold Price Weight Converter: Mastering Tola to Gram Conversions

    Gold Price Weight Converter: Mastering Tola to Gram Conversions

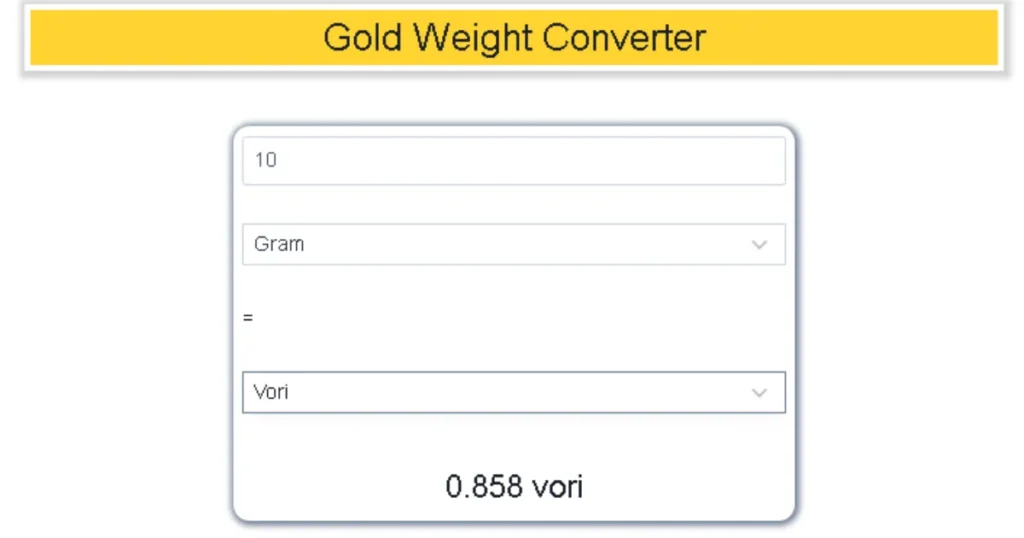
    Navigating the world of precious metals can feel like learning a second language, especially when you encounter traditional units like the Tola. If you’ve ever walked into a jewelry shop in South Asia or checked gold rates online, you’ve likely seen prices quoted in both grams and tolas. But how do you know exactly what you’re paying for?

    The Gold Price Weight Converter (Tola to Gram) is your essential bridge between heritage and modern precision. Whether you are inheriting family heirlooms, planning a wedding purchase, or investing in gold bullion, understanding this conversion is the only way to ensure you aren’t overpaying. In this guide, we’ll break down why these units exist, the exact math used by jewelers today, and how you can use our conversion logic to trade gold like a pro.

    What is a Tola and Why Does it Matter?

    The Tola is a traditional unit of mass that has been the heartbeat of the gold trade in South Asia—specifically India, Pakistan, Bangladesh, and Nepal—for centuries. Its roots trace back to the Vedic period, derived from the Sanskrit word Tula, meaning a balance or scale. Historically, a tola was equivalent to the weight of 100 Ratti seeds, making it a natural, standardized way for ancient merchants to trade fairly.

    In the modern era, while the world has largely shifted to the metric system (grams and kilograms), the gold industry remains deeply sentimental. Most local “Sarafa” markets still quote daily rates in tolas. Understanding the Gold Price Weight Converter matters because:

    • Price Transparency: Global gold spot prices are quoted in Troy Ounces or Grams. To compare a local price to the international market, you must convert the weight accurately.
    • Jewelry Valuation: Most traditional jewelry designs are crafted based on tola weights (e.g., a “5-tola set”).
    • Investment Accuracy: When buying gold biscuits or coins, even a 0.1-gram discrepancy can lead to a significant financial difference given today’s high gold prices.

    Step-by-Step Guide: How to Convert Tola to Grams

    • Using a Gold Price Weight Converter is straightforward once you know which “standard” your jeweler is using. Follow these steps to get an exact measurement:
    1. Identify the Regional Standard: * International/Standard Tola: Used most officially, this is 11.6638 grams.
    2. Modern/Jeweler’s Tola: Many modern jewelers round this to 10 grams or 12 grams for easier math. Always ask: “How many grams are you counting in one tola?”
    3. Determine Your Total Tolas: Look at your gold receipt or the weight of the item you are interested in.
    4. Apply the Conversion Factor: * To get Grams, multiply your Tolas by 11.6638.
    5. To get Tolas, divide your Grams by 11.6638.
    6. Verify the Purity: Remember that the weight (grams) stays the same regardless of whether the gold is 22K or 24K, but the price will change based on that weight.
    7. Calculate the Final Value: Multiply the resulting gram weight by the current “Gold Price per Gram” in your city.

    The Math Behind the Gold Weight Conversion

    • The science of the Tola was standardized during the British Raj in 1833. It was defined as 180 troy grains. To understand how we arrive at the modern metric equivalent, we use the following relationship:
    • $$1 \text{ Tola} = 11.6638038 \text{ grams}$$
    • For most commercial purposes, this is rounded to 11.66 grams. If you are looking for the inverse (how many tolas are in a single gram), the formula is:
    • $$1 \text{ Gram} \approx 0.0857 \text{ Tolas}$$
    • In some specific markets, like Pakistan, a “local tola” is sometimes treated as exactly 12.5 grams (based on a different historical division where 1 kg = 80 tolas). However, the $11.66$ figure remains the most widely accepted standard for high-end gold trading.
    • Real-Life Scenarios: Tola vs. Gram in Action
    • To see how the Gold Price Weight Converter affects your wallet, let’s look at two practical examples:

    Scenario A: Buying a Wedding Set

    • Imagine you are buying a necklace that the jeweler says weighs 4.5 Tolas. If the current gold rate is $80 per gram, how much is the gold worth?
    • Conversion: $4.5 \times 11.6638 = 52.48 \text{ grams}$

    • Total Cost: $52.48 \times 80 = \$4,198.40$

    • Note: Without the converter, you might mistake 4.5 tolas for 45 grams, leading to a massive error in your budget!

    • Scenario B: Selling Heirloom Coins
    • You have three old gold coins that weigh a total of 35 grams on a kitchen scale. You want to know how many tolas that is to check the local newspaper rates.
    • Conversion: $35 \div 11.6638 = 3.00 \text{ Tolas}$

    • You now know you have exactly 3 tolas of gold to trade.

    FAQs: Frequently Asked Questions

    • 1. Is 1 Tola always equal to 10 grams?
    • No. While some jewelers use 10 grams as a “metric tola” to simplify calculations, the official and traditional weight is 11.6638 grams. Always clarify the conversion rate with your dealer before paying.
    • 2. Does the weight of a Tola change with gold purity (22K vs 24K)?
    • No, the weight remains the same. A tola is a measure of mass, not purity. However, a tola of 24K gold will be more expensive than a tola of 22K gold because it contains more pure gold content.
    • 3. Why do some countries use different weights for a Tola?
    • Tradition varies by region. For instance, in parts of Pakistan, a tola is often calculated as 12.5 grams to align with the “80 tolas per kilogram” rule. In India, 11.66 grams is the standard.
    • Conclusion & CTA
    • Understanding the Gold Price Weight Converter (Tola to Gram) is the hallmark of a savvy investor. By mastering the 11.6638 ratio, you protect yourself from market confusion and ensure every milligram of your precious metal is accounted for.
    • Ready to make an informed investment? Use our digital conversion tool today to get real-time weight calculations and stay ahead of the market!
  • Electric Unit Cost Calculator (LESCO/KElectric): Your Ultimate Guide to Lowering Bills

    Electric Unit Cost Calculator (LESCO/KElectric): Your Ultimate Guide to Lowering Bills

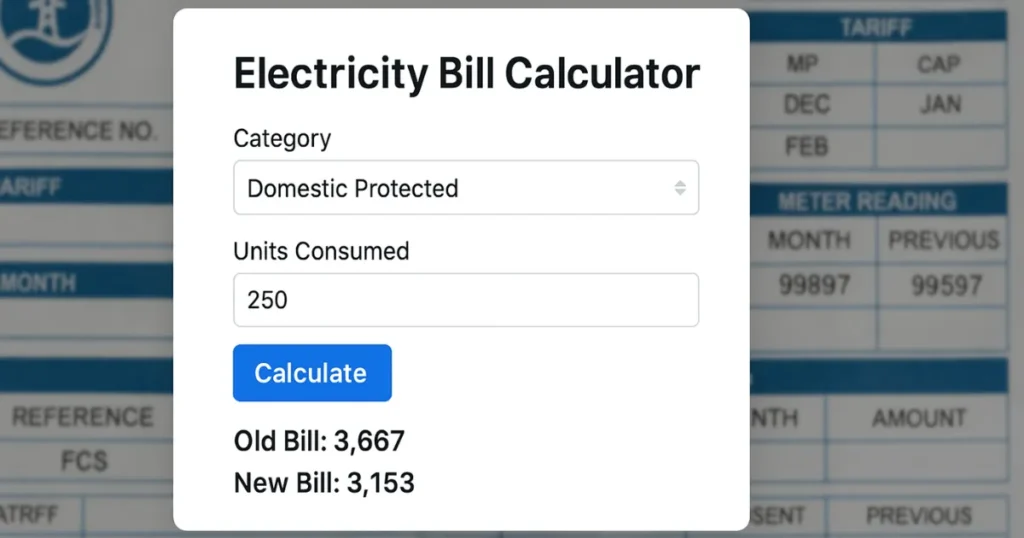
    Why Your Electricity Bill Is Rising and How to Control It

    Managing household expenses in Pakistan has become a significant challenge, with electricity costs leading the charge. Whether you are a resident of Lahore served by LESCO or living in the bustling metropolis of Karachi under K-Electric, understanding your bill is no longer optional—it is a necessity for financial survival.

    The Electric Unit Cost Calculator is a vital tool designed to strip away the complexity of “slabs,” “surcharges,” and “adjustments.” Many consumers are shocked to see their bills double even when their usage only increases by a few units. This happens because of the progressive slab system used by NEPRA. This guide and tool empower you to predict your monthly costs before the bill arrives, allowing you to adjust your consumption patterns in real-time. By the end of this article, you’ll not only know how to calculate your costs but also how to dodge the most expensive billing traps.

    What is the Electric Unit Cost Calculator and Why it Matters

    The Electric Unit Cost Calculator (LESCO/KElectric) is a specialized digital tool that computes your total electricity payable amount based on the current year’s tariff rates. In Pakistan, electricity is not sold at a flat rate; instead, the price per unit ($kWh$) increases as you cross specific thresholds known as “slabs.”

    Why This Tool is Essential in 2026

    As of March 2026, the energy landscape in Pakistan has seen several updates:

    • Slab Progression: Crossing the 200 or 300-unit mark can trigger a massive jump in the base rate, sometimes moving from Rs. 13 to over Rs. 30 per unit instantly.
    • Fuel Price Adjustments (FPA): These are monthly variables. For instance, in March 2026, an FPA of approximately Rs. 1.98 per unit was introduced to account for global fuel fluctuations.
    • Protected vs. Non-Protected Status: The government distinguishes between “Protected” consumers (those using consistently low energy) and “Non-Protected” consumers. The calculator helps you identify which category you fall into.

    Using this tool matters because it provides transparency. It breaks down the “hidden” costs like the Electricity Duty, PTV Fee, and GST, which often make up 20% to 30% of your total bill.

    Step-by-Step Guide: How to Use the Calculator

    Using the calculator is straightforward. Follow these steps to get an accurate estimate of your LESCO or K-Electric bill:

    1. Check Your Meter Reading: Go to your physical meter and note the current reading (the numbers followed by $kWh$). Compare this with the “Current Reading” on your previous month’s bill.

    2. Calculate Units Consumed: Subtract the old reading from the new one.

      • Example: $12,500$ (Current) – $12,200$ (Previous) = $300$ units.

    3. Select Your Provider: Choose LESCO (for Lahore and surrounding areas) or K-Electric (for Karachi) from the tool’s dropdown menu.

    4. Enter Your Connection Type: Select “Residential,” “Commercial,” or “Industrial.” Most homes use the A-1 Residential tariff.

    5. Input Consumed Units: Type the number of units you calculated in Step 2.

    6. Review the Breakdown: The tool will instantly generate a report showing:

    • Cost of Electricity: The price based on your specific slab.
    • FCA/QTA: The latest fuel and quarterly adjustments.
    • Government Taxes: GST, Income Tax, and Surcharges.

    7.Final Total: This is the amount you will likely see on your next bill.

    The Math Behind the Bill: Understanding the Formula

    Calculating an electric bill in Pakistan isn’t as simple as multiplying units by a single rate. It follows a Cumulative Slab Logic.

    The Base Formula

    The total cost of electricity ($TC$) is calculated as:

    $$TC = (U_1 \times R_1) + (U_2 \times R_2) + \dots + (U_n \times R_n) + Fixed\_Charges + Taxes$$

    Where:

    • $U$: Units within a specific slab.
    • $R$: The rate assigned to that slab.

    2026 Tariff Example (Non-Protected)

    • 1 – 100 Units: Approx. Rs. 22.44

    • 101 – 200 Units: Approx. Rs. 28.91

    • 201 – 300 Units: Approx. Rs. 33.10

    If you consume 250 units, you don’t pay Rs. 33.10 for all of them. The math works like this:

    1. First 100 units $\times$ 22.44 = Rs. 2,244

    2. Next 100 units $\times$ 28.91 = Rs. 2,891

    3. Remaining 50 units $\times$ 33.10 = Rs. 1,655

    4. Total Variable Cost: Rs. 6,790 (plus taxes and surcharges).

    Note: Once you cross 700 units, the rate for all units often jumps to the highest tier (e.g., Rs. 47.69 per unit), making the “cliff” very steep.

    Real-Life Scenarios

    Scenario 1: The “Protected” Small Household

    Ali lives in a small apartment and uses only fans and LED lights. He consumes 190 units. Because he has stayed under 200 units for six consecutive months, he is a Protected Consumer.

    • His Rate: Approx. Rs. 13.01 per unit.

    • Estimated Bill: ~Rs. 2,500 (low taxes).

    Scenario 2: The Summer Peak (AC Usage)

    Sara uses one Inverter AC during the night in Lahore (LESCO). Her total consumption hits 450 units.

    • Her Status: Non-Protected.

    • The Result: She enters the Rs. 40.22 slab.

    • Estimated Bill: Between Rs. 22,000 and Rs. 25,000 after including GST (18%), FPA, and Electricity Duty.

    Scenario 3: The Commercial Shop

    A small mobile shop in Karachi (K-Electric) uses 350 units. Commercial rates are higher, roughly Rs. 45.43 per unit flat.

    • Estimated Bill: ~Rs. 16,000 + Fixed charges.

    Frequently Asked Questions (FAQs)

    1. What is the difference between Protected and Non-Protected consumers?

    Protected consumers are those who use less than 200 units per month for six consecutive months. They enjoy a much lower base rate. Once you exceed 200 units in a single month, you risk losing this status and being moved to the significantly more expensive Non-Protected category.

    2. Why is my bill higher even if my units are the same as last month?

    This is usually due to Fuel Price Adjustment (FPA) or Quarterly Tariff Adjustment (QTA). These charges reflect the change in the cost of fuel (like LNG or Coal) used to generate power. For March 2026, a combined hike of Rs. 1.98 per unit was applied.

    3. Does the calculator include GST and other taxes?

    Yes, a professional calculator accounts for the 18% GST, Electricity Duty (1.5%), and the PTV Fee (Rs. 35). However, Income Tax is only applied to non-filers or bills exceeding certain thresholds.

    Conclusion & CTA

    Understanding your electricity costs is the first step toward energy independence. By using our Electric Unit Cost Calculator (LESCO/KElectric), you can stop guessing and start planning. Whether you need to decide if you should switch to Solar or simply want to know if you can afford to run the AC for another hour, this tool is your financial compass.

  • How Much is Your Phone Costing Your Health? Try This Screen Time Health Impact Calculator

    How Much is Your Phone Costing Your Health? Try This Screen Time Health Impact Calculator

    In 2026, the average adult spends nearly 7.5 hours a day staring at a screen. While our devices connect us to the world, they also tether us to sedentary habits that quietly erode our physical and mental well-being. From “tech neck” to disrupted sleep cycles, the cumulative effect of digital consumption is a modern epidemic.

    But how do you move from a vague feeling of “I use my phone too much” to actionable health data? This is where the Screen Time Health Impact Calculator becomes your most vital digital wellness ally. By quantifying your exposure, this tool helps you visualize the invisible strain on your eyes, the cortisol spikes from social scrolling, and the hours of movement you’re losing. In this guide, we’ll explore the science behind digital fatigue and show you exactly how to calculate—and mitigate—your personal health risk.

    What is a Screen Time Health Impact Calculator and Why it Matters

    A Screen Time Health Impact Calculator is a specialized digital assessment tool designed to evaluate the physiological and psychological risks associated with your daily device usage. Unlike a simple “time tracker” found in your phone settings, this calculator cross-references your total hours with health markers like sleep latency, metabolic rate, and musculoskeletal strain.

    Why It Matters

    Understanding your “digital dosage” is critical because screen time isn’t just about lost hours; it’s about biological interference.

    • Melatonin Suppression: High-energy visible (HEV) blue light mimics daylight, tricking your brain into staying awake and ruining your REM sleep.
    • The Sedentary Cascade: Every hour spent sitting is an hour your metabolism slows, increasing the risk of obesity and cardiovascular issues.
    • Cognitive Load: Constant notifications keep your brain in a state of “continuous partial attention,” leading to increased anxiety and decreased focus.

    By using a calculator, you transform abstract habits into concrete health metrics, allowing you to set boundaries before temporary strain becomes chronic damage.

    Step-by-Step Guide: How to Calculate Your Health Impact

    Using a Screen Time Health Impact Calculator is straightforward. Follow these steps to get an accurate picture of your digital footprint:

    1. Gather Your Data: Open your smartphone’s native tracking app (Screen Time on iOS or Digital Wellbeing on Android). Note your average daily hours over the last 7 days.
    2. Categorize Your Usage: Separate your hours into Productive (work/learning) and Recreational (social media/gaming/streaming). The health impact of recreational “doomscrolling” is typically higher due to increased dopamine-loop engagement.
    3. Input Your Sleep Habits: Note how many minutes before bed you last check your phone. If it’s under 60 minutes, your “Sleep Disruption Score” will increase.
    4. Evaluate Physical Symptoms: Check off any recurring issues: dry eyes, headaches, or stiffness in the neck and shoulders.
    5. Calculate the “Active Displacement” Ratio: Subtract your screen hours from your total waking hours. The calculator will determine if your “Movement Window” is sufficient for your age group.
    6. Review Your Risk Level: The tool will categorize you into Low, Moderate, or High Risk based on 2026 health guidelines.

    The Math Behind the Impact: The “Digital Strain” Formula

    While the biology of health is complex, researchers often use a simplified “Digital Strain Index” ($DSI$) to quantify the risk. The impact is generally dose-dependent, meaning the longer you stare without a break, the higher the physiological cost.

    The basic conceptual formula used by many calculators is:

    $$DSI = \left( \frac{H \times I}{B} \right) + S$$

    Where:

    • $H$ = Total Daily Screen Hours.

    • $I$ = Intensity Factor (Recreational content like TikTok/Gaming has a higher $I$ than E-books).

    • $B$ = Break Frequency (Using the 20-20-20 rule—every 20 minutes, look 20 feet away for 20 seconds—significantly lowers this value).
    • $S$ = Sleep Interference Constant (added if screens are used within 1 hour of bedtime).

    The math proves that even a small increase in break frequency ($B$) can exponentially lower your total strain, even if your total hours ($H$) remain high for work.

    Real-Life Scenarios: Seeing the Numbers in Action

    How do these calculations look for everyday people? Let’s look at three common profiles:

    Scenario 1: The Remote Professional (The “Productive Overloader”)

    • Usage: 9 hours (8h work, 1h personal).

    • Habit: Uses a monitor at eye level but forgets to blink.

    • Impact: High risk for Computer Vision Syndrome (CVS) and “Tech Neck.”
    • Calculation: High $H$, but if they take a break every 30 minutes, their $DSI$ drops by 40%.

    Scenario 2: The Social Scroller (The “Dopamine Loop”)

    • Usage: 5 hours (mostly social media).

    • Habit: Uses the phone in bed until the moment they fall asleep.

    • Impact: Severe sleep disruption and a 70% higher likelihood of reported anxiety.

    • Calculation: The $S$ (Sleep) constant in our formula doubles their health risk score despite having fewer total hours than the professional.

    Scenario 3: The Optimized User (The “Digital Minimalist”)

    • Usage: 3 hours.

    • Habit: No screens 90 minutes before bed; uses the 20-20-20 rule.

    • Impact: Low risk. Their metabolic rate remains stable because screen time is offset by 60 minutes of daily activity.

    Frequently Asked Questions (FAQs)

    1. Is blue light really that dangerous for my eyes?

    Current 2026 research indicates that while blue light from screens may not cause permanent blindness, it is the primary driver of Digital Eye Strain and circadian rhythm disruption. It forces your eyes to work harder to focus, leading to fatigue and headaches.

    2. How much screen time is “safe” for an adult?

    Most health organizations suggest limiting recreational screen time to less than 2 hours per day. For work-related usage, the “safety” depends on ergonomic setup and taking frequent visual and physical breaks.

    3. Can I reverse the health damage from too much screen time?

    Yes! Most symptoms like dry eyes, neck pain, and poor sleep improve within 7 to 14 days of implementing a “digital detox” or strict screen-free windows before bedtime.

    Conclusion & CTA

    Your devices should be tools for your success, not anchors for your health. By using a Screen Time Health Impact Calculator, you take the first step toward a more mindful, energized, and pain-free life. Whether you need to adjust your monitor height or set a “digital sunset” at 9 PM, the data will help you make the right choice.

    Ready to see your score? Use our interactive Screen Time Health Impact Calculator today and take control of your digital well-being!