Category: Education, Math & Conversions

  • From Marla to Square Feet: The Ultimate Guide to Regional Land Measurement

    From Marla to Square Feet: The Ultimate Guide to Regional Land Measurement

    Navigating the world of real estate can feel like learning a whole new language, especially when you encounter traditional units like the Marla. If you have ever found yourself staring at a land deed or a property listing wondering exactly how much space you are getting, you are not alone. Converting Marla to Square Feet is one of the most common hurdles for buyers and sellers in South Asia. This regional converter simplifies the process, ensuring you don’t lose a single inch of your investment due to a math error. Whether you are planning a garden or building your dream home, understanding this conversion is the first step toward a successful project.

    What is a Marla and Why it Matters

    A Marla is a traditional unit of area used primarily in India, Pakistan, and Bangladesh. While the international real estate market often defaults to square feet or meters, the Marla remains the cultural and legal standard in many regions. Its importance cannot be overstated; property taxes, legal boundaries, and even bank loans are often calculated based on this specific unit.

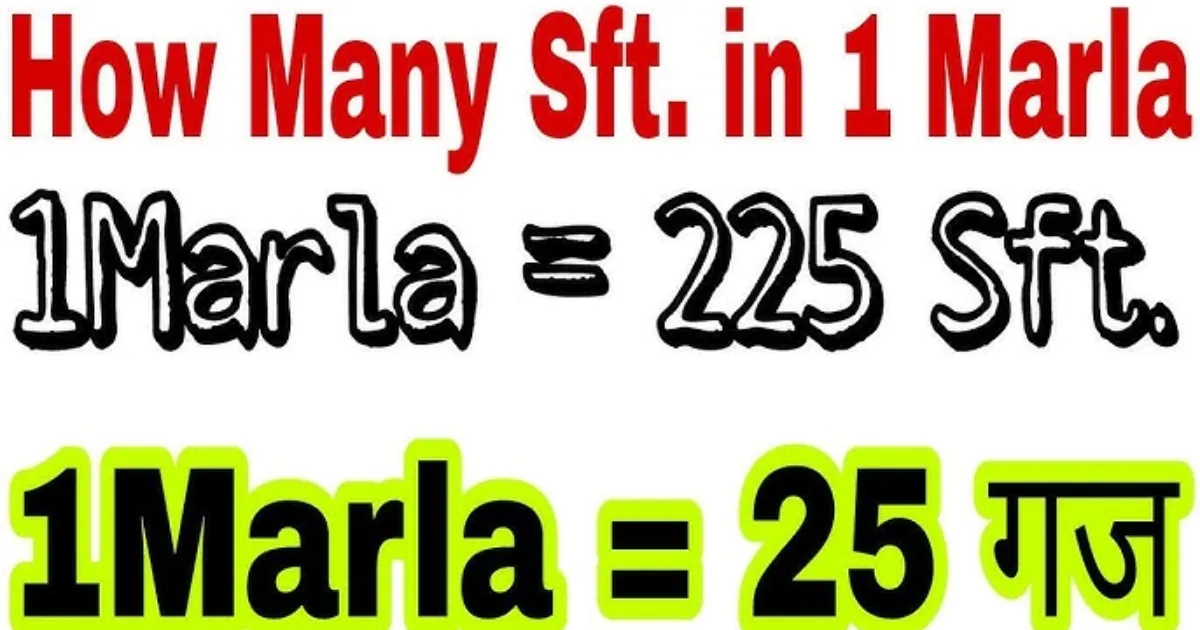
    The reason this conversion is so vital is that the definition of a Marla can actually shift depending on where you are. Historically, under British rule, a standard Marla was fixed at 272.25 square feet. However, in modern urban development—specifically in cities like Lahore or parts of India—a “Big Marla” (272.25 sq ft) and a “Small Marla” (225 sq ft) often coexist. Knowing exactly which one you are dealing with can mean the difference between a spacious backyard and a cramped alleyway. Mastery of this unit ensures transparency in every transaction.

    Step-by-Step Guide: How to Use the Marla Converter

    Using our regional converter is straightforward. To ensure you get the most accurate results for your specific location, follow these simple steps:

    • Identify Your Region: Determine if your area uses the “Standard” (272.25) or “Local/Small” (225) Marla.

    • Locate the Measurement: Find the total number of Marlas listed on your property documents or plot map.

    • Apply the Conversion: * For the Standard Marla, multiply the number by 272.25.

      • For the Small Marla, multiply the number by 225.

    • Verify the Total: Once you have the result in square feet, you can easily compare it against standard construction requirements (like the size of a standard bedroom or garage).

    • Account for Fractions: If your plot is “5.5 Marlas,” ensure you include the decimal point to avoid significant rounding errors.

    The Math Behind the Measurement

    Understanding the science of land measurement requires looking back at the “Guz” or “Karam.” Traditionally, a Marla was defined as a square of 3 Karams by 3 Karams. Since one Karam is roughly 5.5 feet, the math works out as follows:

    $$1 \text{ Karam} = 5.5 \text{ feet}$$
    $$1 \text{ Sarsahi} = 1 \text{ Karam} \times 1 \text{ Karam} = 30.25 \text{ sq ft}$$
    $$1 \text{ Marla} = 9 \text{ Sarsahis}$$

    When we multiply the area of a Sarsahi by 9, we get the classic definition:

    $$30.25 \times 9 = 272.25 \text{ sq ft}$$

    In modern housing societies, this was rounded down to 225 square feet to create a cleaner grid of 15ft x 15ft units. Always check your local society bylaws to see which “math” they are applying to your specific plot.

    Real-Life Scenarios

    To put this into perspective, let’s look at how these conversions play out in the real world:

    Scenario 1: The Suburban Homebuyer

    Amir is looking at a “5 Marla” plot in a new modern housing scheme. In this specific development, they use the 225 sq ft standard.

    • Calculation: $5 \times 225 = 1,125$ square feet.

      Amir now knows he has enough space for a cozy three-bedroom house but might have a very small front lawn.

    Scenario 2: The Rural Inheritance

    Priya inherits a piece of ancestral land measured at 20 Marlas (1 Kanal). Because it is rural agricultural land, it follows the standard 272.25 sq ft rule.

    • Calculation: $20 \times 272.25 = 5,445$ square feet.

      Priya realizes her land is significantly larger than a standard urban “Kanal” (usually 4,500 sq ft), giving her more value than she initially thought.

    FAQs (Frequently Asked Questions)

    1. Is a Marla the same size everywhere?

    No. In Pakistan and India, a Marla can be either 225, 250, or 272.25 square feet depending on the city and the specific housing authority (like CDA or LDA). Always verify the local standard before signing a contract.

    2. How many Marlas make a Kanal?

    In almost all regional systems, 20 Marlas equal 1 Kanal. However, the total square footage of that Kanal will change based on whether you are using the 225 or 272.25 Marla unit.

    3. Why did the size of a Marla change over time?

    The change was largely for convenience in urban planning. A 225 sq ft Marla allows for easy 15×15 foot dimensions, making it much simpler for architects and developers to design uniform housing blocks compared to the traditional 272.25 sq ft unit.

    Conclusion & CTA

    Understanding the conversion between Marla and Square Feet is the hallmark of a savvy property owner. By mastering these regional nuances, you protect your investment and gain clarity in your construction planning. Don’t leave your measurements to guesswork! Use our Regional Marla Converter tool today to get instant, accurate results tailored to your specific location.

    Ready to calculate your plot size? Try our free converter now and start building with confidence!

  • Master the Polynomial Long Division Calculator: A Step-by-Step Guide

    Master the Polynomial Long Division Calculator: A Step-by-Step Guide

    How to Master Polynomial Long Division Without the Headache

    Let’s be honest: the moment a math problem shifts from simple numbers to a string of $x^2$, $y^3$, and nested parentheses, most people feel a sudden urge to close the textbook. Polynomial long division is one of those academic hurdles that feels unnecessarily complex, often leading to “sign errors” that ruin the entire calculation. Whether you are a student trying to ace your algebra exam or a professional dealing with complex functions, the manual process is tedious and prone to human slip-ups.

    That is where a Polynomial Long Division Calculator becomes your best friend. Instead of spending twenty minutes scratching your head over a single remainder, this tool breaks down the process instantly. It doesn’t just give you the answer; it mirrors the logical flow of a mathematician, helping you visualize the “divide, multiply, subtract, bring down” cycle. In this guide, we’ll explore how this tool works, the logic behind it, and how you can use it to master your coursework.

    What is a Polynomial Long Division Calculator and Why it Matters

    At its core, a Polynomial Long Division Calculator is a specialized digital engine designed to divide one polynomial (the dividend) by another (the divisor) of the same or lower degree. If you remember long division from third grade—where you find how many times 5 goes into 27—this is the “grown-up” version. Instead of simple integers, we are dealing with terms like $3x^3 + 2x – 5$.

    Why is this tool essential?

    • Factoring Higher-Degree Equations: When you need to find the roots of a cubic or quartic function, division is often the only way to “break down” the equation into manageable parts.
    • Identifying Asymptotes: In calculus, dividing polynomials helps you find slant asymptotes, which are crucial for graphing rational functions.
    • Accuracy and Speed: A single missed negative sign in the subtraction phase cascades through the rest of the problem. A calculator eliminates this risk, providing a perfect “check” for your manual work.
    • Conceptual Clarity: By seeing the step-by-step breakdown, users can identify exactly where their manual logic went wrong, making it an excellent tutoring aid.

    Step-by-Step Guide: Using the Calculator Effectively

    Using the tool is straightforward, but inputting your data correctly is key to getting the right result. Follow these steps:

    • Step 1: Arrange your Terms. Ensure both your dividend and divisor are in descending order of power (e.g., $x^2 + 5x + 6$ instead of $5x + 6 + x^2$).

    • Step 2: Account for Missing Powers. If your equation is $x^3 + 1$, you must treat it as $x^3 + 0x^2 + 0x + 1$. Most calculators need these “placeholders” to align columns correctly.

    • Step 3: Input the Dividend. Enter the primary polynomial you want to divide into the first input box.

    • Step 4: Input the Divisor. Enter the polynomial you are dividing by into the second box.

    • Step 5: Calculate. Hit the “Solve” or “Divide” button.

    • Step 6: Review the Breakdown. The tool will present the Quotient (the result) and the Remainder (what’s left over). Many tools will also show the long-form “tableau” showing each subtraction step.

    The Math Behind the Tool: The Division Algorithm

    The calculator follows a very specific mathematical protocol known as the Division Algorithm for Polynomials. To understand what the tool is doing under the hood, we use this fundamental formula:

    $$P(x) = D(x) \cdot Q(x) + R(x)$$

    Where:

    • $P(x)$ is the Dividend (the total value).
    • $D(x)$ is the Divisor (what you are dividing by).
    • $Q(x)$ is the Quotient (how many times it fits).
    • $R(x)$ is the Remainder (the leftover part, which must be of a lower degree than the divisor).

    The process mimics basic arithmetic division. The tool looks at the leading term of the divisor and asks, “What do I need to multiply this by to match the leading term of the dividend?” It then multiplies the entire divisor by that factor, subtracts it from the dividend, and repeats the process with the new result until the remaining degree is lower than the divisor’s degree.

    Real-Life Scenarios: When Will You Use This?

    Polynomial division isn’t just for passing a test; it has practical applications in science and finance.

    Scenario 1: Engineering and Signal Processing

    Engineers often use polynomial division when working with System Transfer Functions. If an engineer needs to simplify a complex feedback loop in a circuit, they may divide two high-order polynomials to determine the stability of the system.

    Scenario 2: Financial Modeling

    In advanced quantitative finance, analysts use polynomial interpolation to predict market trends. If a model generates a complex curve representing interest rate changes, dividing that polynomial can help isolate “linear trends” from “noise” or volatile remainders.

    Scenario 3: Physics (Projectiles)

    If a physicist has a polynomial representing the path of a projectile influenced by air resistance, they might divide that function by a linear factor (like time) to find the average velocity or to simplify the equation for specific intervals of flight.

    FAQs: Common Questions About Polynomial Division

    1. What is the difference between Long Division and Synthetic Division?

    Synthetic division is a “shortcut” method, but it only works when your divisor is a linear factor in the form $(x – c)$. Polynomial long division is more versatile because it works for any divisor, including quadratic or cubic ones.

    2. Can the remainder be a negative number?

    Absolutely. In polynomial division, the “remainder” is itself a polynomial. It can have negative coefficients or even be a negative constant.

    3. What does it mean if the remainder is zero?

    If $R(x) = 0$, it means the divisor is a factor of the dividend. This is incredibly helpful for solving equations because it tells you that you’ve found an exact “root” or piece of the puzzle.

    Conclusion: Simplify Your Math Journey

    Polynomial long division doesn’t have to be a source of frustration. By understanding the underlying algorithm and utilizing a Polynomial Long Division Calculator, you can transform a tedious 20-minute chore into a 5-second verification. This tool allows you to focus on the “why” of the math rather than getting bogged down in the “how” of repetitive subtraction.

    Ready to clear your homework queue? Try our Polynomial Long Division Calculator today to get instant, step-by-step solutions and master your algebra goals!

  • The Ultimate Word to Page Converter (Double Spaced) Guide

    The Ultimate Word to Page Converter (Double Spaced) Guide

    Ever found yourself staring at a growing word count, wondering if you’ve finally hit that 10-page requirement for your term paper? Or perhaps you’re drafting a manuscript and need to know how much physical “heft” your story actually has. Understanding the relationship between words and pages—especially when double spacing is involved—is a vital skill for students, lawyers, and authors alike.

    While it seems like a simple question, the answer is often a moving target. Factors like font type, margin size, and paragraph breaks can shift your layout significantly. However, when we talk about the standard academic or professional format, there are reliable benchmarks you can use to plan your writing perfectly. This guide will demostrate how a Word to Page Converter functions as your secret weapon for hitting length requirements without the guesswork.

    What is a Word to Page Converter and Why It Matters

    A Word to Page Converter is a conceptual or digital tool used to estimate the physical length of a document based on its total word count. In the professional world, “length” is rarely measured by words alone; it’s measured by the space it occupies on a printed sheet.

    Why the “Double Spaced” Standard?

    Double spacing is the gold standard for academic essays (MLA, APA), legal briefs, and book manuscripts. It provides ample room for editors and professors to leave comments, making the text much more readable and less “dense.”

    Why accuracy matters:

    • Academic Compliance: Missing a page count by half a page can result in grade deductions.

    • Publishing Standards: Publishers often request manuscripts in a specific page range to calculate printing costs.

    • Time Management: Knowing that 500 words equal roughly two pages helps you pace your writing sessions effectively.

    Step-by-Step Guide: How to Calculate Pages from Words

    Converting your word count manually doesn’t require a math degree, but it does require following a specific set of formatting rules. Follow these steps to ensure your “page” matches the industry standard.

    • Set Your Font: Use a standard 12-point font. Times New Roman is the universal benchmark, though Arial or Calibri are common alternatives.

    • Adjust Margins: Ensure your margins are set to 1 inch (2.54 cm) on all sides (Top, Bottom, Left, and Right).

    • Apply Double Spacing: In your word processor, set the line spacing to 2.0. This adds a full blank line of space between every line of text.

    • The Golden Rule: For a standard 12pt Times New Roman document with 1-inch margins, 250 to 300 words typically equal one double-spaced page.

    • Account for Paragraphs: If you use frequent, short paragraphs, you will reach the bottom of the page faster than if you write long, dense blocks of text.

    The Math Behind the Conversion

    To understand how we get to the “275-word average,” we have to look at the typography. A standard letter-size page ($8.5 \times 11$ inches) with 1-inch margins leaves a printable area of $6.5 \times 9$ inches.

    Using a standard 12pt font, a single line of text usually holds about 10–12 words. A single-spaced page typically contains about 50–55 lines of text. When you apply double spacing, you effectively cut that line count in half, leaving you with roughly 25–27 lines.

    The simplified formula for estimation is:

    $$P = \frac{W}{275}$$

    Where:

    • $P$ = Number of Pages

    • $W$ = Total Word Count

    • $275$ = The average words per double-spaced page.

    If you are using a wider font like Arial, you might find that only 250 words fit on a page. If you use a narrow font like Courier, the character spacing might change that number again.

    Real-Life Scenarios

    How does this play out in the real world? Let’s look at a few common writing tasks:

    Scenario 1: The College Freshman

    Alex has been assigned a 5-page research paper on climate policy, double-spaced. By using our conversion logic, Alex knows he needs to aim for approximately 1,375 to 1,500 words. Knowing this number upfront prevents Alex from “fluffing” the paper with useless adjectives at the last minute.

    Scenario 2: The Aspiring Novelist

    Sarah is told by a literary agent that they want to see the first 30 pages of her novel. Sarah’s manuscript is currently single-spaced. To meet the professional “double-spaced” submission standard, she realizes those 30 pages will represent roughly 8,250 words.

    Scenario 3: The Legal Assistant

    A law firm needs to file a 20-page brief. The assistant calculates that they need to provide approximately 5,500 words of content. This helps the legal team delegate sections of the brief to different writers while staying within the court’s page limits.

    FAQs

    1. Does the font type really change the page count that much?

    Yes. For example, 500 words in Arial (which is wider) will take up more physical space than 500 words in Times New Roman. Always check your specific style guide (APA, MLA, etc.) for the required font.

    2. Do images and charts count toward the word-to-page conversion?

    The conversion formulas only account for text. If you add a medium-sized chart, it generally occupies the space of about 100–150 words. You’ll need to adjust your total word count target downward if your paper is heavy on visuals.

    3. Is 500 words always 2 pages double-spaced?

    Usually, yes. In a standard format, 500 words will land right at the bottom of the second page or the top of the third. It is the most common “shorthand” conversion used in schools.

    Conclusion & CTA

    Converting words to pages doesn’t have to be a guessing game. By sticking to the 275-words-per-page rule for double-spaced documents, you can write with confidence, knowing exactly when you’ll hit your target. Whether you’re drafting a thesis or a formal report, proper formatting ensures your work looks professional and is easy to digest.

    Ready to see how your project measures up? Use our interactive Word to Page Converter tool today to get an instant, accurate estimate for your next big project!

  • Master the Switch: Scientific Notation to Decimal Converter Guide

    Master the Switch: Scientific Notation to Decimal Converter Guide

    Have you ever looked at a number like $6.022 \times 10^{23}$ and felt your brain do a quick somersault? You aren’t alone. Whether you are a student tackling chemistry homework or a professional analyzing massive data sets, scientific notation can feel like a foreign language. It’s a brilliant shorthand for scientists, but for the rest of us, it can make it incredibly difficult to visualize the actual scale of a number. Is it millions? Billions? Or just a tiny fraction of a cent?

    That is exactly where a Scientific Notation to Decimal Converter comes into play. Instead of manually counting zeros and risking a misplaced decimal point, this tool does the heavy lifting for you. It bridges the gap between complex mathematical shorthand and the “normal” numbers we use every day. In this guide, we’ll break down why this conversion matters and show you exactly how to master the process so you never have to second-guess your zeros again.

    What is a Scientific Notation to Decimal Converter and Why it Matters?

    A Scientific Notation to Decimal Converter is a specialized digital tool designed to translate numbers from the “power of 10” format into standard decimal form (also known as “long-form” or “standard notation”).

    Why does this matter? In fields like astronomy, microbiology, and finance, numbers are often too large or too small to write out conveniently. For example, the mass of the Earth is roughly $5.97 \times 10^{24}$ kilograms. Writing that out with 22 zeros trailing behind it is not only tedious but prone to human error. However, while scientific notation is efficient for writing, it isn’t always intuitive for comparison or communication.

    Converting these figures back to decimals is crucial for:

    • Data Visualization: Understanding the literal “size” of a value.

    • Precision Engineering: Ensuring that measurements are translated correctly for manual machinery.

    • General Literacy: Making scientific findings accessible to the general public who may not be comfortable with exponents.

    By using a converter, you eliminate the risk of “zero-blindness”—that common mistake where you accidentally add or subtract a zero, changing the value by a factor of ten.

    Step-by-Step Guide: How to Use the Converter

    Using our Scientific Notation to Decimal Converter is straightforward. Follow these steps to get an instant, accurate result:

      • Step 1: Identify your Coefficient. Look at the first part of your number (e.g., in $4.5 \times 10^3$, the coefficient is $4.5$).

      • Step 2: Note the Exponent. Look at the power of 10. This tells you how many places to move the decimal point.

      • Step 3: Enter the Data. Input the coefficient and the exponent into the respective fields of the tool.

      • Step 4: Check the Sign. If the exponent is positive (e.g., $10^5$), the number is large. If it is negative (e.g., $10^{-5}$), the number is a small decimal.

      • Step 5: Hit Convert. The tool will instantly display the “expanded” decimal version.

      • Step 6: Copy and Use. You can now copy the long-form number for your reports, spreadsheets, or calculations.

    The Math Behind the Magic: The Formula

    Under the hood, the converter follows a very specific mathematical rule. Scientific notation always follows the format:

    $$a \times 10^n$$

    Where:

    • $a$ is the coefficient (a number between 1 and 10).

    • $n$ is the exponent (an integer).

    The Rule of Displacement: The exponent $n$ dictates exactly how many places the decimal point moves.

    1. Positive Exponent ($+n$): You move the decimal point to the right. This creates a large number. For every jump, if you run out of digits, you add a zero.

    2. Negative Exponent ($-n$): You move the decimal point to the left. This creates a small decimal (less than 1). You fill the empty jumps with leading zeros.

    Example: $3.1 \times 10^4$. We move the decimal 4 places to the right: $3.1 \rightarrow 31 \rightarrow 310 \rightarrow 3100 \rightarrow 31000$.

    Real-Life Scenarios

    How does this look in the real world? Here are a few practical examples where a Scientific Notation to Decimal Converter saves the day:

    Scenario 1: The Space Enthusiast An astronomer tells you that a specific star is $9.46 \times 10^{12}$ kilometers away. By using the converter, you see that this is actually 9,460,000,000,000 km (9.46 trillion kilometers). It helps you realize the staggering vastness of space compared to a simple “12” on a page.

    Scenario 2: Biology Lab Work A lab technician is measuring the width of a human hair, which is approximately $7.0 \times 10^{-5}$ meters. Converting this to a decimal yields 0.00007 meters. This decimal form is often easier to use when comparing the width to other microscopic objects in a standard spreadsheet.

    Scenario 3: Federal Budgeting If a government project is estimated to cost $\$1.2 \times 10^9$, the converter clarifies that the taxpayers are looking at $1,200,000,000 (1.2 billion). Seeing the nine zeros helps in understanding the true fiscal impact.

    FAQs: Common Questions About Scientific Notation

    1. Can any number be written in scientific notation? Yes! Any real number can be converted. However, it is most useful for very large or very small numbers. Standard numbers like “50” are usually left as they are, though they could technically be written as $5.0 \times 10^1$.

    2. What does a negative exponent mean? A negative exponent signifies that the number is between 0 and 1. It does not mean the number itself is negative. It simply means you are dividing by 10 that many times.

    3. Why do calculators sometimes show “E” instead of $10^n$?“E” stands for exponent. On many calculators, $5.2E6$ is the same as $5.2 \times 10^6$. Our converter handles both formats to make your life easier.

    Conclusion & CTA

    Understanding scientific notation is a vital skill, but you shouldn’t have to do the tedious counting yourself. Our Scientific Notation to Decimal Converter is built to provide you with instant accuracy, whether you are working on a high-stakes physics project or just curious about a number you saw in the news.

    Ready to simplify your data? Use our free Scientific Notation to Decimal Converter now and get your results in seconds!

  • The Ultimate Guide to Calculating Your GPA for Matric and Inter: Simplify Your Path to Success

    The Ultimate Guide to Calculating Your GPA for Matric and Inter: Simplify Your Path to Success

    Navigating the transition from the traditional percentage system to the Grade Point Average (GPA) system can feel like trying to solve a puzzle without the box art. Whether you are a student in Pakistan aiming for top-tier universities or a parent trying to track your child’s academic progress, understanding how GPA works for Matric and Intermediate (Inter) levels is crucial.

    Many students feel overwhelmed when they see letters like ‘A+’ or numbers like ‘3.7’ instead of a simple 85%. This transition isn’t just about changing numbers; it’s about aligning with international academic standards. This guide is designed to demystify the process, showing you exactly how your hard work in the exam hall translates into a competitive GPA. By the time you finish reading, you’ll be able to calculate your standing with confidence and precision.

    What is GPA for Matric/Inter and Why It Matters

    In the context of Matric (9th and 10th grade) and Intermediate (11th and 12th grade), the Grade Point Average (GPA) is a standardized way of measuring academic achievement. Traditionally, boards in Pakistan relied solely on total marks and percentages. However, to harmonize with global standards and provide a fairer assessment of a student’s capability across different subjects, the GPA system has become the gold standard.

    Why does it matter so much? First, university admissions—both locally and abroad—now prioritize GPA to filter applications. A high GPA tells an admissions officer that you are consistently performing well across your entire curriculum, not just “cramming” for one specific high-weightage subject. Second, it levels the playing field. Since different elective subjects may have varying levels of difficulty, the GPA system uses a weighted scale to ensure that a student taking Physics is evaluated fairly alongside a student taking Humanities. Essentially, it turns your raw scores into a universal language of success that employers and educators worldwide understand.

    Step-by-Step Guide: How to Calculate Your GPA

    Calculating your GPA doesn’t require a PhD in mathematics. Follow these simple steps to find your score:

    • Step 1: List Your Subjects and Marks: Write down every subject you took in your Matric or Inter exams along with the marks you obtained.

    • Step 2: Identify the Grade Point for Each Subject: Use the official board grading table to convert your percentage in each subject into a Grade Point (typically on a scale of 0.0 to 4.0). For example, 80% and above usually equals a 4.0.

    • Step 3: Determine Credit Hours: Each subject has a specific number of “Credit Hours” (CH). In many boards, a core science subject might be 3 or 4 CH, while an elective might be 2.

    • Step 4: Calculate Quality Points: Multiply the Grade Point of each subject by its Credit Hours.

      • Example: If you got a 4.0 in Biology (3 CH), your Quality Points for that subject are $4.0 \times 3 = 12.0$.

    • Step 5: Sum Everything Up: Add up all your Quality Points and then add up all your total Credit Hours.

    • Step 6: The Final Division: Divide your total Quality Points by the total Credit Hours. The resulting number is your GPA.

    The Math and Formula Behind the GPA

    The logic behind the GPA is a weighted average. Unlike a simple average where every number has equal “say,” a weighted average gives more importance to subjects that take more time to study (higher credit hours).

    The primary formula used is:

    $$GPA = \frac{\sum (Grade \ Point \times Credit \ Hours)}{\sum Credit \ Hours}$$

    In this equation:

    • $\sum$ (Sigma): This symbol simply means “the sum of.”

    • Grade Point: This is the numerical value assigned to your letter grade (e.g., A+ = 4.0, A = 3.7, B = 3.0).

    • Credit Hours: This represents the weight of the course.

    By using this formula, the system ensures that performing well in a major 4-credit hour subject has a more significant positive impact on your overall score than a 1-credit hour auxiliary subject.

    Real-Life Scenarios

    To help you visualize how this works, let’s look at two common student profiles:

    Scenario A: The Balanced All-Rounder

    Sara is a Pre-Medical student. She scores an ‘A’ (3.7) in Biology (4 CH), an ‘A-‘ (3.3) in Chemistry (4 CH), and a ‘B+’ (3.0) in English (2 CH).

    • Quality Points: $(3.7 \times 4) + (3.3 \times 4) + (3.0 \times 2) = 14.8 + 13.2 + 6.0 = 34.0$

    • Total Credit Hours: $4 + 4 + 2 = 10$

    • Sara’s GPA: $34.0 / 10 = 3.40$

    Scenario B: The High-Achiever

    Ahmed is a Matric student. He gets a ‘A+’ (4.0) in Math (3 CH), an ‘A+’ (4.0) in Physics (3 CH), and an ‘A’ (3.7) in Urdu (2 CH).

    • Quality Points: $(4.0 \times 3) + (4.0 \times 3) + (3.7 \times 2) = 12 + 12 + 7.4 = 31.4$

    • Total Credit Hours: $3 + 3 + 2 = 8$

    • Ahmed’s GPA: $31.4 / 8 = 3.92$

    FAQs: Common Questions About Matric/Inter GPA

    1. Is a 4.0 GPA possible in Matric/Inter?

    Yes, it is possible! If you score above the threshold (usually 80% or 85% depending on the board’s specific policy) in every single subject, you will achieve a perfect 4.0 GPA.

    2. Does a low GPA in Matric affect my university admission?

    While Intermediate (FSc/ICS) grades usually carry more weight for university entrance, your Matric GPA is often used as a tie-breaker or as a percentage of the total “aggregate” score in competitive fields like Engineering or Medicine.

    3. What is the difference between GPA and CGPA?

    GPA (Grade Point Average) usually refers to the score of a single semester or year. CGPA (Cumulative Grade Point Average) is the average of your GPA across your entire degree or two-year program (e.g., combining 1st year and 2nd year Inter).

    Conclusion & Next Step

    Understanding your GPA is the first step toward taking control of your academic future. It shifts the focus from just “passing” to mastering each subject according to its weight and importance. By using the formulas and steps outlined above, you can stop guessing and start planning your path to your dream university.

  • How to Easily Convert Your CGPA to Percentage (HEC/Board Standards)

    How to Easily Convert Your CGPA to Percentage (HEC/Board Standards)

    If you’ve ever looked at your transcript and felt a wave of confusion about how your CGPA to Percentage actually translates in the “real world,” you are definitely not alone. Whether you are applying for a scholarship, a government job, or an international university, they often demand a percentage rather than a decimal point out of 4.0. It feels like a high-stakes math riddle, and getting it wrong could mean the difference between an accepted application and a missed opportunity.

    That’s exactly why a dedicated converter tool is a lifesaver. Instead of manually crunching numbers and worrying about whether you’re following the Higher Education Commission (HEC) or your specific board’s guidelines, a converter does the heavy lifting for you. It bridges the gap between different grading systems, ensuring your hard work is represented accurately and professionally on every application you submit.

    What is a CGPA to Percentage Converter and Why it Matters

    A CGPA to Percentage converter is a specialized tool designed to translate your Cumulative Grade Point Average (typically on a 4.0 or 5.0 scale) into a percentage format (out of 100). In the academic landscape of Pakistan and many Commonwealth countries, the HEC provides specific formulas to ensure uniformity across different universities.

    Why does this matter so much? Consistency is key. Different institutions have different “difficulty curves.” A 3.5 CGPA at one university might be an 80%, while at another, it could be an 85% depending on the internal grading criteria. However, for standardized applications—like those for the CSS exams, HEC scholarships, or foreign visas—a standardized percentage is often the “universal language.” Using a precise converter ensures:

    • Accuracy: You avoid human error in complex calculations.

    • Compliance: You stay aligned with official HEC or Board regulations.

    • Competitiveness: In many merit-based selections, even a 1% difference can change your ranking significantly.

    Step-by-Step Guide: How to Use the Converter

    Using our CGPA to Percentage tool is straightforward. Follow these simple steps to get your results in seconds:

    • Step 1: Identify Your Scale. Check your transcript to see if your CGPA is out of 4.0 (standard for most universities) or 5.0.

    • Step 2: Enter Your CGPA. Type your current CGPA into the input box. Be precise—include all decimal points (e.g., 3.67).

    • Step 3: Select the Authority. Choose whether you are following HEC guidelines (for University students) or a Technical Board (for matric/intermediate/diploma levels).

    • Step 4: Click Convert. Hit the “Calculate” button to process the conversion.

    • Step 5: Review and Save. The tool will display your percentage. It’s a good idea to take a screenshot or note it down for your CV.

    The Math/Formula Behind It

    While the tool makes it look easy, there is a specific logic running in the background. The HEC and various Boards use different formulas to ensure fairness.

    For most university-level conversions in Pakistan, the HEC often refers to a linear scaling or a specific percentage-based mapping. A common general-purpose formula used for a 4.0 scale is:

    $$\text{Percentage} = \frac{\text{Obtained CGPA}}{\text{Total CGPA}} \times 100$$

    However, some boards and specific international standards (like the AIU or certain Indian boards) use a “constant factor” formula, such as:

    $$\text{Percentage} = (\text{CGPA} \times 9.5)$$

    In the HEC system, the conversion is often non-linear, meaning they provide a table where a 4.0 equals 90-100%, a 3.5 equals 80%, and so on. Our tool incorporates these specific mapping tables to ensure you aren’t just getting a raw math result, but a policy-compliant one.

    Real-Life Scenarios

    To help you understand how this looks in practice, let’s look at a few examples:

    Scenario A: The Scholarship Applicant

    Amna has a CGPA of 3.80 / 4.0. She is applying for a scholarship in Germany that requires a minimum of 85%. By using the HEC-aligned converter, she finds her percentage is approximately 88%. She can now confidently apply, knowing she exceeds the requirement.

    Scenario B: The Government Job Seeker

    Ali is applying for a position through the PPSC. The form asks for a percentage, but his transcript only shows a 3.20 / 4.0. Using the standard formula $(\frac{3.2}{4.0} \times 100)$, the tool shows him he has an 80%. This allows him to fill out his form without the stress of being disqualified for “incorrect data.”

    FAQs

    1. Is the CGPA to Percentage conversion the same for all universities?

    Not necessarily. While the HEC provides a standard guideline, some private universities have their own internal grading increments. Always check if your university has a conversion formula printed on the back of your transcript first.

    2. Why do some formulas multiply by 9.5?

    The $9.5$ multiplier is a standard used largely by the CBSE and some engineering boards. It accounts for the fact that even a student with a 10/10 CGPA rarely gets a perfect 100% in all subjects due to internal marking nuances.

    3. Does HEC accept the simple division formula?

    For most official purposes, yes, but they also use a “Grade-Point Table.” Our tool is updated with the latest HEC-recognized tables to ensure the highest accuracy for Pakistani graduates.

    Conclusion & CTA

    Converting your CGPA to Percentage shouldn’t be a source of anxiety. Whether you’re heading toward a professional career or further studies, having the right numbers is the first step toward success. Don’t leave your future to guesswork—use our precise CGPA to Percentage Converter today to get the accurate results you need for your next big move!

    Ready to calculate your score? Enter your CGPA above and get started!

  • Master the Conversion: Grams to Tablespoons Made Easy

    Master the Conversion: Grams to Tablespoons Made Easy

    If you’ve ever been halfway through a batch of chocolate chip cookies only to realize your scale’s batteries are dead, you know the sudden spike of kitchen panic. You’re looking at a recipe that demands “125g of butter,” but all you have in your drawer is a set of measuring spoons. How do you bridge the gap between weight and volume without ruining your bake?

    Kitchen conversions can feel like a high-stakes math test, especially when accuracy is the difference between a fluffy cake and a literal brick. This guide is designed to be your digital sous-chef. We’re stripping away the confusion and providing you with a reliable way to convert Grams to Tablespoons for all your favorite ingredients. Whether you are a professional pastry chef or a weekend warrior in the kitchen, understanding these conversions ensures your results are consistent, delicious, and stress-free every single time.

    What is Grams to Tablespoons and Why it Matters

    In the culinary world, there are two main ways to measure ingredients: mass (grams) and volume (tablespoons). Grams are the gold standard for professional baking because they represent a precise weight that doesn’t change based on how tightly you pack an ingredient. Tablespoons, on the other hand, are a measure of the space an ingredient occupies.

    The importance of this conversion lies in the density of what you are cooking with. A tablespoon of lead would weigh much more than a tablespoon of feathers; similarly, a tablespoon of granulated sugar is much heavier than a tablespoon of cocoa powder.

    If you ignore these differences and use a “one-size-fits-all” conversion, your recipes will suffer. Too much flour makes bread tough; too little sugar prevents browning. Master the conversion, and you master the science of the kitchen. It allows you to follow international recipes from Europe (which favor grams) or the US (which favor volume) with total confidence.

    Step-by-Step Guide: How to Convert Like a Pro

    Converting grams to tablespoons doesn’t have to be a guessing game. Follow these steps to ensure your measurements are as accurate as possible:

    • Identify Your Ingredient: Density is key. Determine if you are measuring a liquid (water, oil), a dry powder (flour, powdered sugar), or a granular solid (salt, white sugar).

    • Use the Standard Ratio: As a baseline, remember that for water, 15 grams equals 1 tablespoon.

    • Aerate Your Dry Goods: If measuring flour or cocoa, fluff it up with a fork before scooping. This prevents “packing,” which adds extra grams to your tablespoon.

    • The Spoon-and-Level Method: To get a “true” tablespoon, scoop the ingredient into the spoon until it overflows, then use the back of a flat knife to level it off. Never pack it down unless the recipe specifically says “packed.”

    • Consult a Conversion Chart: Since every ingredient has a different weight, use a quick reference table for the most common items:

    • All-Purpose Flour: 1 tbsp ≈ 8g
    • Granulated Sugar: 1 tbsp ≈ 12.5g
    • Butter: 1 tbsp ≈ 14g
    • Milk/Water: 1 tbsp ≈ 15g
    • Cocoa Powder: 1 tbsp ≈ 7g

    The Math Behind the Measurements

    To convert grams to tablespoons mathematically, we use the concept of density. The basic formula for finding the volume ($V$) when you know the mass ($m$) and the density ($\rho$) is:

    $$V = \frac{m}{\rho}$$

    In the kitchen, we simplify this. Since 1 tablespoon is defined as approximately 14.79 milliliters, and for water, 1 gram equals 1 milliliter, the math for a liquid is straightforward. However, for dry goods, we use a conversion factor based on the specific density of the ingredient.

    The general formula for kitchen use is:

    $$\text{Tablespoons} = \frac{\text{Grams}}{\text{Grams per Tablespoon of the specific ingredient}}$$

    For example, if you have 100 grams of sugar and you know that sugar is roughly 12.5 grams per tablespoon, you would calculate:

    $$100 / 12.5 = 8 \text{ tablespoons}$$

    Real-Life Scenarios

    Scenario 1: The Holiday Cake

    You are following a vintage French recipe that calls for 200g of white sugar. You don’t have a scale. Since granulated sugar is roughly 12.5g per tablespoon, you divide 200 by 12.5.

    Result: You need exactly 16 tablespoons (which is also 1 cup) to keep that cake perfectly sweet.

    Scenario 2: The Morning Roux

    You’re making a gravy and need 30g of all-purpose flour. Flour is lighter than sugar, weighing in at about 8g per tablespoon.

    Result: $30 / 8 = 3.75$. You should use 3 level tablespoons plus 2 teaspoons to get the thickness just right.

    FAQs (Frequently Asked Questions)

    1. Is a “heaping” tablespoon the same as a standard tablespoon?

    No. A standard tablespoon in a recipe always refers to a level tablespoon. A “heaping” spoon can contain up to 50% more ingredient, which can easily ruin the chemistry of a baking recipe.

    2. Does it matter if I use a US tablespoon vs. a UK tablespoon?

    Slightly. A US tablespoon is $14.79\text{ ml}$, while a UK tablespoon is exactly $15\text{ ml}$. For most home cooking, the difference is negligible, but for very small, precise bakes, it’s best to stick to one measurement system throughout the recipe.

    3. Why is my flour measurement always different?

    Flour is notorious for settling. If you dip the tablespoon directly into a tightly packed bag, you might get 12g. If you sift it first, you might get 7g. Always “fluff, scoop, and level” for the best accuracy.

    Conclusion & CTA

    Converting grams to tablespoons is an essential skill that transforms you from a recipe-follower into a confident chef. While a digital scale is always the most precise tool, understanding the density and the math behind your ingredients ensures you’re never sidelined by a missing piece of equipment.

    Ready to take your baking to the next level? Bookmark this guide for your next kitchen session, or better yet, grab our printable conversion chart to hang on your fridge so you never have to guess again!